Lab 7
Objectives
- Write loops that require nesting
- Learn a little about working with images
Part 0: Getting started
To begin, create a file called lab07.py inside your labs directory and import middimage at the top of the file.
Part 1: A better greyscale converter
The greyscale image that we produced in class looked fine, but we can make it a little better.
An old photographer’s trick is to use colored filters when shooting black and white film. Doing this can dramatically change the appearance of the image. For example, we might use a yellow filter when shooting landscapes - this lets through the red and green light (trees, grass, dirt), but blocks out blue (sky and water) - making foliage glow while keeping the sky dark and contrasty.
With digital photography, we don’t actually need physical color filters any more, we can just adjust the color channels directly during post-processing.
We are going to do this by allowing the user to specify a “weight” (number between 0 and 1) to be applied to each color channel.
Instead of averaging the three channel values together, we’ll multiply each channel by its respective weight and then sum the result (and convert it to an int).
If the weights sum to one, we call this a weighted average. It is still an averaging operation, but it favors the items with the higher values (this is, for example, how grades are sometimes calculated1). Note that what we calculated earlier is just a weighted average where the weights all where the same (for three items, the weight would be 1/3 = 0.333).
One interesting set of weights is (0.299, 0.587, 0.114) for red, green, and blue, respectively.
This set of weights has been calculated to match the sensitivity of the human eye and is closer to the perceived luminance of a color image.
It is not a requirement that the weights sum to one, but you should keep it in that ballpark. Make sure to try a collection of different weights. Often you will find that different weights will dramatically alter your images and there isn’t a single “correct” setting.
To achieve all of this, we’ll write a function called greyscale_weighted(image, red_weight, green_weight, blue_weight).
greyscale_weighted
|
|||||||||
|---|---|---|---|---|---|---|---|---|---|
| Parameters |
|
||||||||
| Returns |
MiddImage
|
||||||||
Steps
- Step 1: Copy over the code that we wrote for greyscale conversion during class. Rename the function
greyscale_weightedand add the three additional parameters for weights. For now, they shouldn’t do anything. - Step 2: Test your function with one of the images from class (or an image of your choice) and some weights. It should work, but the weights should not change the behavior.
- Step 3: Our previous greyscale image still had three channels for RGB values. That’s OK, but it’s storing a lot of repeated information. Instead, we’d like to produce a single-channel greyscale image.
- To do so, start your function off by creating a new
MiddImagewith a single channel rather than copying the original image (usingmiddimage.new(width, height, mode="L")). Use theheightandwidthproperties of your original image as the width and height of the new image. - Then, when you assign the averaged pixel value, do so using a single value rather than a tuple of three identical values.
- To do so, start your function off by creating a new
- Step 4: Test your function once again. Confirm that it works with a single channel.
- Step 5: Now that we’ve done the prep work, we’re ready to use our weights! Rather than summing values and dividing by 3, multiply each of the R, G, and B values by the appropriate weights to get your luminance value. Make sure to convert to an integer in the end!
- Step 6: Test your function and confirm that you get different results with different weights.
Part 2: A sepia converter
Sepia is a very common photo filter — just about every photo editor has some variant of it. This mimics the effect of an old chemical process that left black and white images yellowish in appearance. We can achieve this effect by creating a greyscale image, and then adjusting the red and blue channels to give it a yellowish tint. If we just add some yellow to everything, however, it doesn’t look very good. So we are going to treat the high values, low values and mid values separately.
The process works like this. First calculate the luminance of the pixels as you did in “greyscale”. If we just use this luminance value for all three channels, we will get the greyscale image we already created (why do you think that is the case?). Instead, the new red value should be evaluated by multiplying the luminance by the appropriate factor below. Do the same to create the new blue value. The green channel can take the raw luminance value.
So, for example, if we have a luminance of 130, you create a new color with (130 * 1.15, 130, 130 * 0.85) = (149, 130, 110). If you had a luminance of 50, your color would be (55, 50, 45). Don’t forget that the values have to be integers.
| type | range of luminance values | red weight | blue weight |
|---|---|---|---|
| shadow | \([0-63)\) | 1.1 | 0.9 |
| mids | \([63-193)\) | 1.15 | 0.85 |
| highlights | \([193-255]\) | 1.08 | 0.93 |
The interval \([0-63)\) indicates that the range includes 0 and excludes 63, so 63 should map to mids. \([193-255]\) indicates that we include 255, but there’s a special case there! Since we are increasing the amount of red, it is possible that the red value will exceed 255. If this happens, the image will look very weird! So, we need to play the same game we did with the sound and make sure the red value does not exceed 255 using the min() function.
Write a function called sepia(image), that takes in a color image and returns a sepia version of the image, following the instructions below.
sepia
|
|||
|---|---|---|---|
| Parameters |
|
||
| Returns |
MiddImage
|
||
Steps
- Step 1: Start by copying over the original
greyscalefunction to use as a base for yoursepiafunction. Rename the function tosepia.- You’ll want to ensure that you use the original
greyscalerather thangreyscale_weightedfor two reasons: (1) it doesn’t take any parameters and (2) your new image will need the three RGB channels.
- You’ll want to ensure that you use the original
- Step 2: In your nested loop, take the
luminancethat you defined for thegreyscalefunction. Using conditionals, determine the appropriate weights for red and blue based on the ranges given for shadows, mids, and highlights in the table above. Be precise about the values that are included and excluded in the range! - Step 3: Set the pixel in the new image to the the
luminanceweighted by your weights. Make sure that you ensure that red does not exceed 255! - Step 4: Test your function with an image of your choice to ensure it produces the desired sepia effect.
Part 3: An image shrinker
Sometimes, you want to reduce the size of an image so that you can share or process it more easily. In this part of the lab, we are going to write a function that allows us to shrink an image by a certain factor.
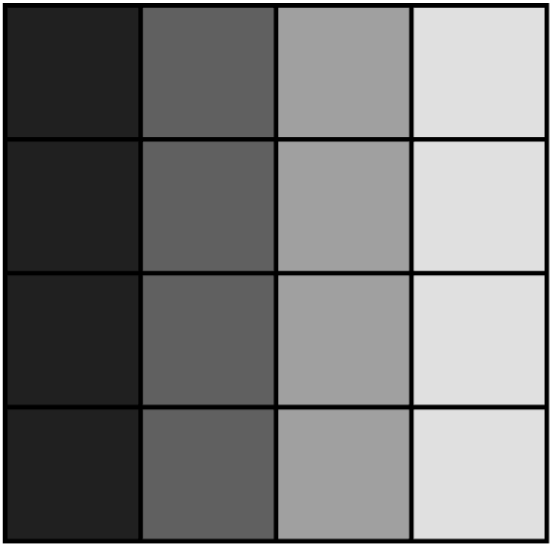
One simple approach that you might think of (and that you’ll implement to start) is just to take every n-th pixel from the original image if you’re shrinking by a factor of n. Consider shrinking the image below by a factor of 2:
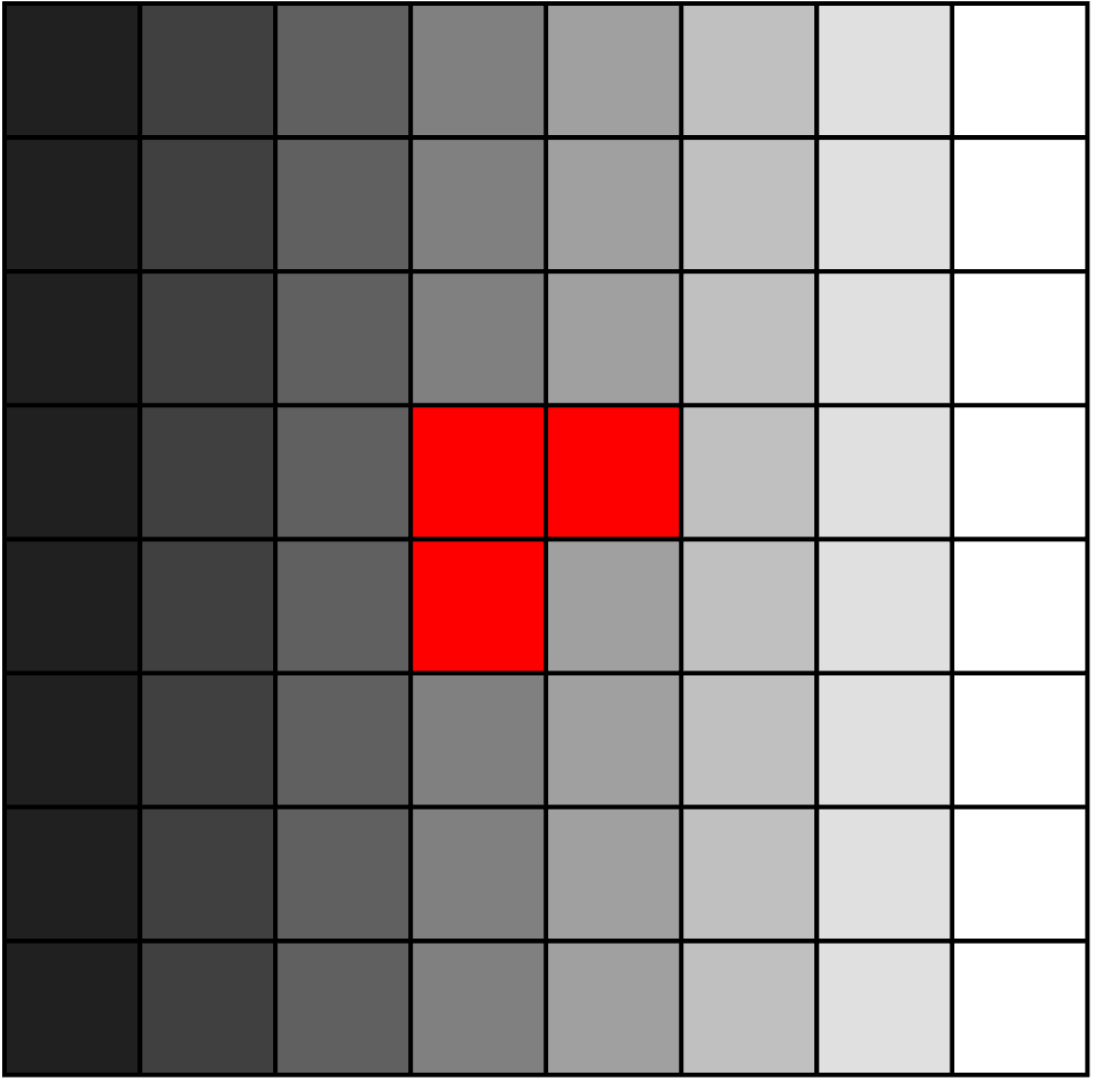
To summarize the pixels in the green dotted area, we could copy over the pixel with the solid green border.
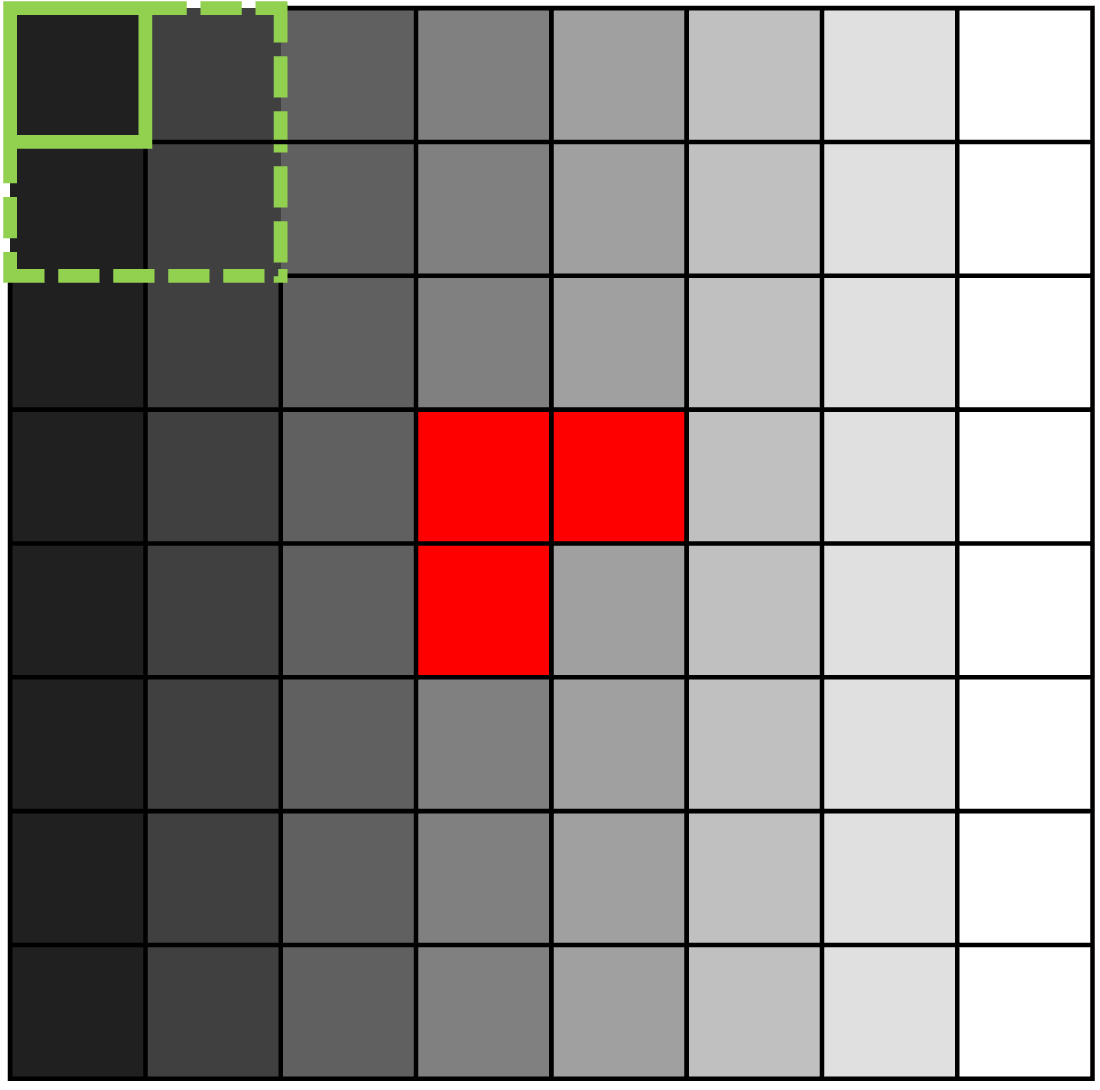
That will mean copying over these pixels… note that the red pixels end up being totally ignored with this strategy.
![]()
You’ll end up with the following image:
You’ve wound up with a totally greyscale image, but what if we want to retain the red color somewhat? We can use a slightly more complex approach than copying over every n-th pixel. Let’s again consider the corner region:
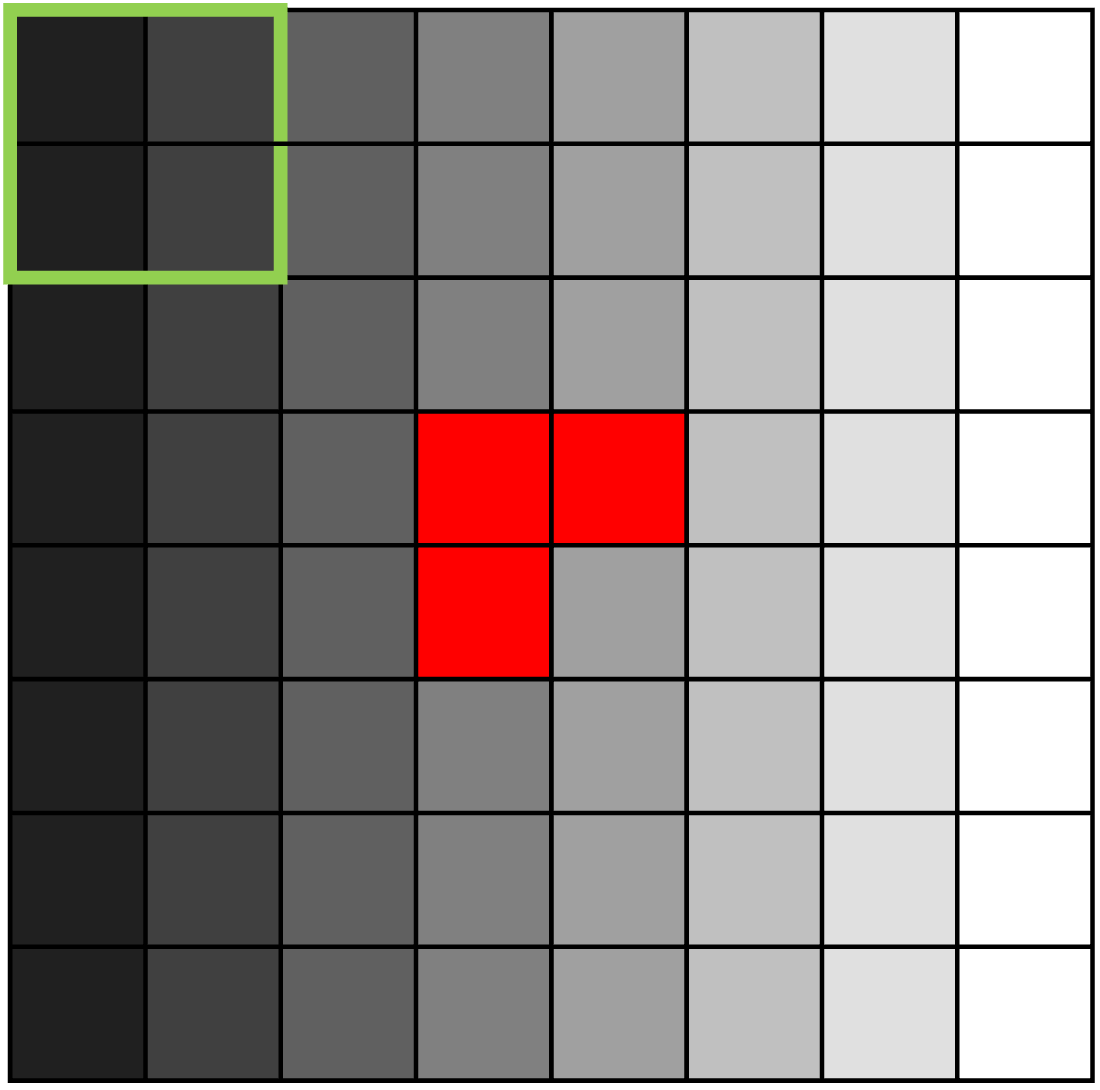
We can summarize that region (an all other regions, outlined in yellow below) by taking the average pixel values in that region. Note that there are now regions capturing our red pixels!
![]()
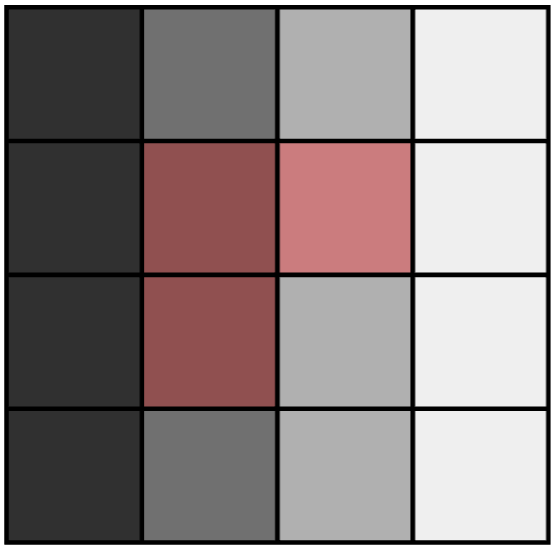
So, we’ll wind up with a slightly nicer image that keeps some (dull) red coloring:
We’ll walk you through implementing this approach. It’s going to involve lots of nested (and nested (and nested)) loops.
shrink
|
|||||
|---|---|---|---|---|---|
| Parameters |
|
||||
| Returns |
MiddImage
|
||||
Steps
- Step 1: Start writing your
shrinkfunction, with the parametersimgandfactor. - Step 2: For this problem, we want to create a new image rather than copying the old one, since the new image should be smaller. Create a new image using
middimage.newwith a width of the original image width divided by the factor and a height of the original image height divided by the factor. Remember that widths and heights must be ints! - Step 3: We’ll start by writing a simple version of the algorithm and add on to it. You’ll be writing nested loops like you did for the other two functions; in this case though, I suggest looping through the dimensions of the smaller copied image.
- Step 4: Set the pixel at
(x, y)in your shrunk image to the pixel at(x * factor, y * factor)in your original image. By doing so, you’ll only copy over the pixels whose positions are divisible byfactor; for instance, iffactor = 2, you’d copy over pixels 0, 2, 4, 6, 8, etc. This matches the first approach demonstrated above. - Step 5: Test your function by calling it with an image of your choice and a factor of 10. It should look pretty similar to the original, but much smaller and a bit pixelated and splotchy.
- Step 6: We are going to complete our algorithm to create an image that is less splotchy. Instead of copying over pixels directly from our old image, we are going to make each pixel the average of pixels in the factor \(\times\) factor square that we are replacing with a single pixel. To do so,
- Create a new list
avg_pixelto represent your pixel; store all zeros for now. - Write a
rangeloop that goes from thexvalue for the left side of the square (x * factor) to the right side of the square (x * factor + factor). - Inside that loop, write a
rangeloop that goes from theyvalue for the top side of the square (y * factor) to the bottom of the square (y * factor + factor). - You want to compute an average for each pixel, so you’ll start by computing sums for each pixel. Add the value at the x and y values from your inner loops to
avg_pixel. You’ll need to do this for each index, soavg_pixel[0] +=the red value,avg_pixel[1] +=the blue value, etc.- For an extra challenge (more nested loops!!!), try to write this in two lines using another loop instead of writing it in three separate lines for the R, G, and B values.
- Remember that you’re computing averages, so you’ll need to divide by the sum, which in this case is your
factorsquared.2 - Pixels need to be stored as a tuple of integers, so make sure when you average the channels that you are computing integer results. You can convert a list to a tuple by calling
tuple()on the list.
- Create a new list
- Step 7: Test your function with this new method. You should once again get a shrunk image, but it should look less splotchy than the one that you generated before 🤞.
Turning in your work
One you are done, submit lab07.py to gradescope and ensure that you have passed all of the tests. Your file should contain three functions: greyscale_weighted, sepia, and shrink. Each function should have a docstring.