Lab 1
Due 2025-02-15 at 11:59p
Download Starter Files Submit on GradescopeObjectives
- Work with scripts
- Gain some experience with the debugger
- Use expressions and variables to solve actual problems
Part 0: Setup
To begin, we will set up directories on your computer to store the code that you will write in this class. Begin by creating a directory called CSCI01451. Within that directory, create four additional directories: labs, homework, challenges, and class.
Now, download the file lab01.zip by clicking the blue “Download Starter Files” button at the top of the lab, and extract the files from the zip file into a directory called lab01 inside your labs directory.
Part 1: Using the debugger
For the first part of this lab, we want you to practice using the debugger that comes with Thonny to find problems in some code.
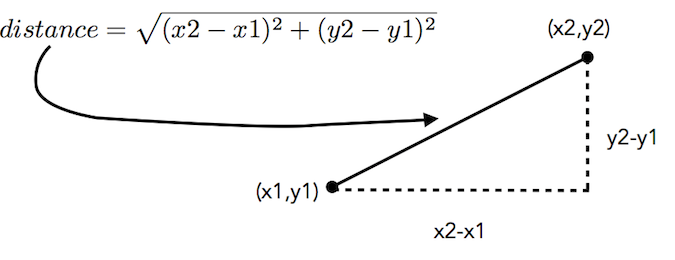
We have written a script for you that calculates the Euclidean distance between two points (x1, y1) and (x2, y2). If your geometry is a little rusty, we can think of the distance between two points as being the hypotenuse of a right triangle formed by the two points and a third point (x2, y1). The length of the hypotenuse is just the square root of the sum of the squares of the other two sides.
Here is the problem: the script we wrote doesn’t work.
When we run the script that tries to calculate the distance between the points (1, 4) and (4, 8), we get the distance to be 2.449489742783178. But, the change in x is 3 (4 - 1), and the change is y is 4 (8-4), so I should have gotten the square root of 9 (3 squared) plus 16 (4 squared). 9+16 is 25, so my distance should be 5. What went wrong?
You are going to figure this out using the debugger.
- Step one: The file
lab01_part1.pycontains the buggy code. Open it in Thonny by following the steps below:- Open Thonny
- choose File/Open…
- Navigate to
CSCI0145/labs/lab01, select the file, and click ‘Open’.
- Step two: Run the file in Thonny. Verify that the distance is incorrectly calculated. (Green play button on toolbar or under the Run menu). It might help to add a
printstatement so that you can see the value fordistance! - Step three: You will notice that lines 10 and 11 of the code have comments indicating what the value should be after running each line of code. To aid in your debugging process, read through the code and for each line, add a comment indicating what the value of the variable should be after that line of code is executed.
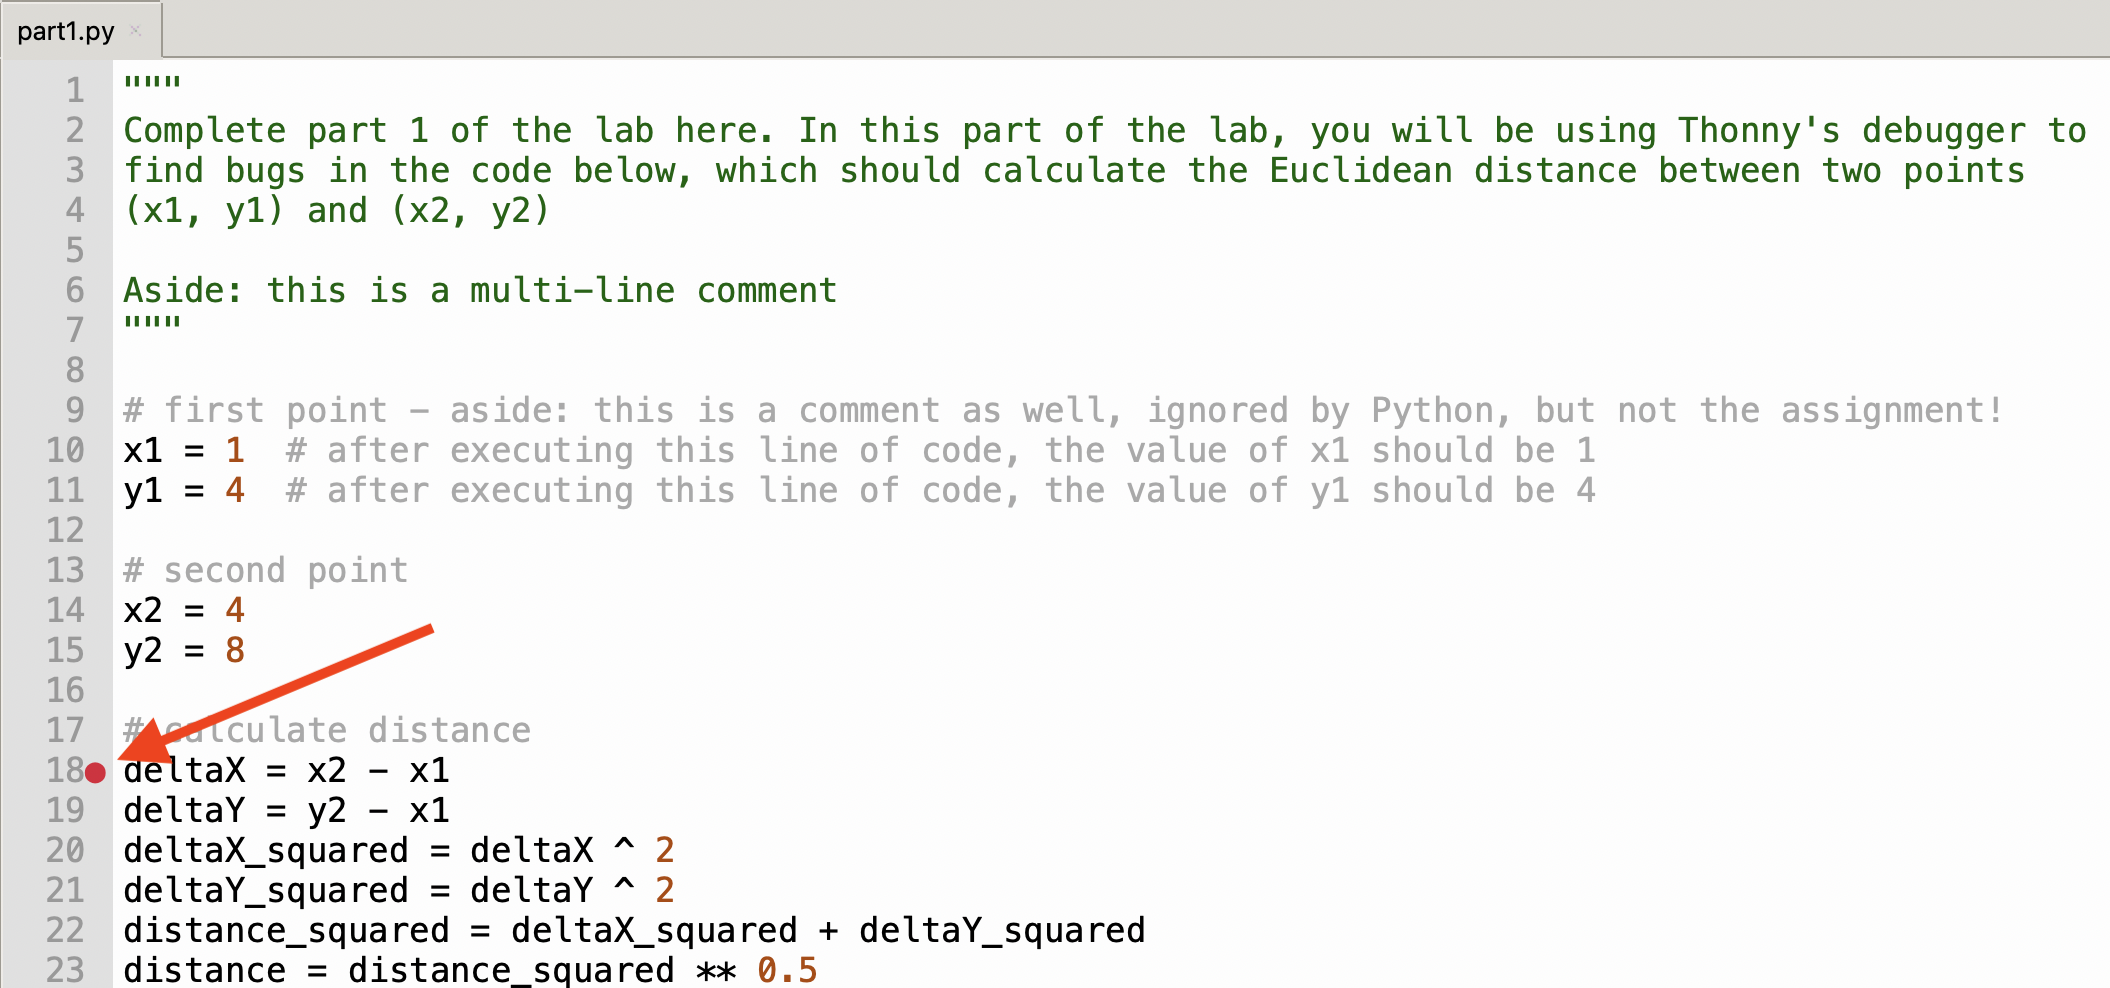
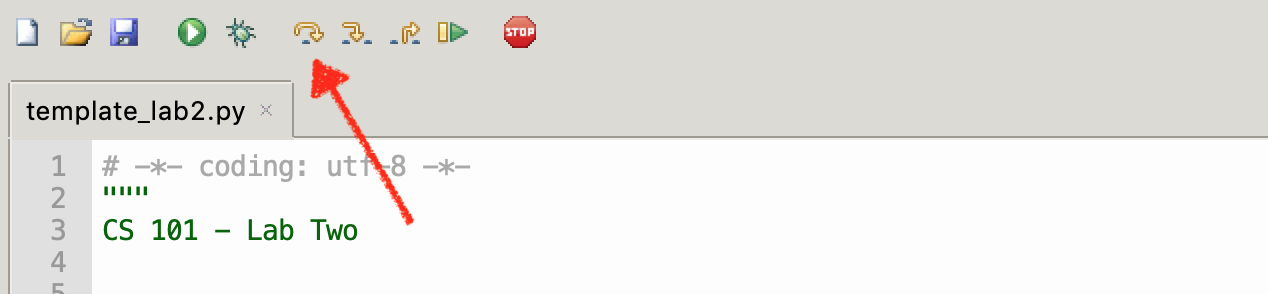
- Step four: Add a breakpoint where deltaX is calculated. You can do this by clicking next to the line numbers in the editor. The breakpoint is where we want the script to stop running so we can pause and look at the values in variables. (You can add as many breakpoints as you need to debug your program). Here is a picture with the breakpoint in place.
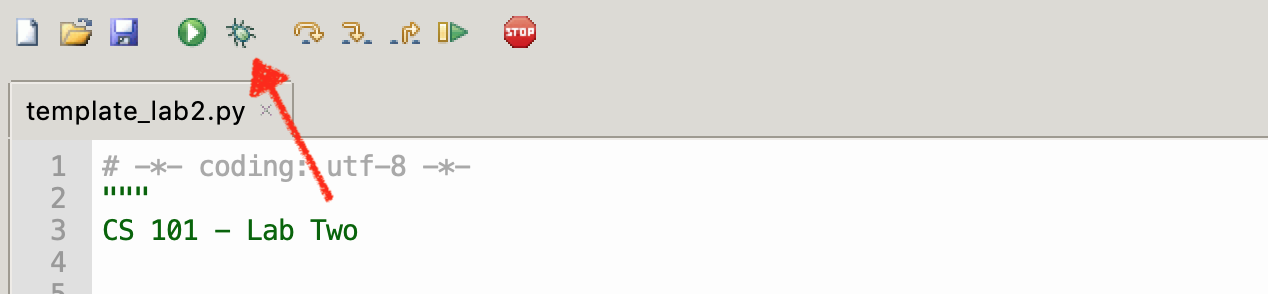
- Step five: Click the ‘Debug current script’ button (it looks like a little green bug).
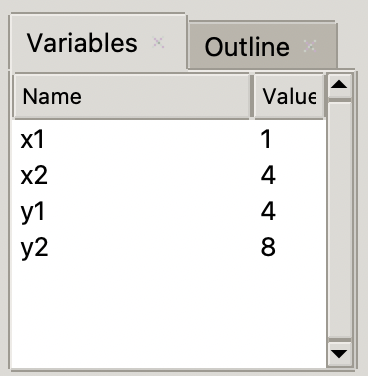
- Step six: Make sure that you have the ‘Variables’ pane open. If it is not visible, you will find it in the ‘View’ menu.
- Step seven: Click the ‘Step over’ button. This will execute one line of your program and stop. As you do this, you will see that the highlighted line tells you where you are in your program. If you want to see how actually the interpreter proceeds in evaluating an expression, you can push the ‘Step into’ button next to the ‘Step over’ and the debugger will show you step by step what the interpreter is doing. It is pretty cool!
- Step eight: As you step over each line of the script, look at the value of the variables in the ‘Variables’ tab. Check to see if the value stored in the variable is what you think it should be. If the value is incorrect, look at the expression you just ran and, if you think there is an error, fix it by changing the code.
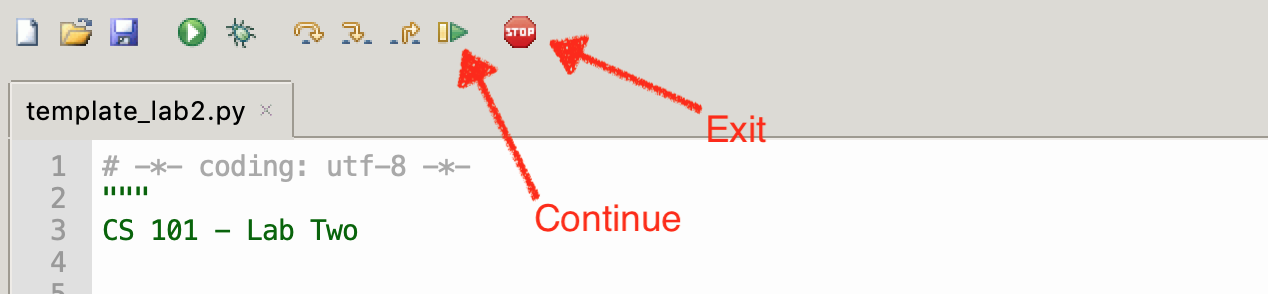
- Step nine: If you make a change, you have to restart the debugging process over. Click the ‘Continue’ button (which resumes execution of your code until it completes or hits another breakpoint), or click the ‘Stop/Exit’ button, which just stops immediately. Before clicking the ‘Debug’ button again to reload the file, make sure you save your new version.
- Step ten: Repeat until the script computes the correct distance.
Part 1.1: Submitting to Gradescope
Now, let’s take a break from programming to submit your code on Gradescope. You’ll submit all of your code for this class to gradescope, and we will use an autograder to help us to grade your assignments. This means that gradescope will run your code and check your answers automatically against the correct answers.
There are some great things about this: you can submit on gradescope as many times as you want to get near-instantaneous feedback, and you might be alerted to problems in your code that you wouldn’t otherwise have noticed. The downside is that automated tests are very picky. If you aren’t passing a test, make sure that you are following the assignment perfectly; for instance, if we say that you must use a specific filename or variable name, there is probably a reason for that!
The screen recording below shows the process of submitting your files on gradescope. Make sure that (a) you always submit all of the files associated with the assignment2 and (b) you always wait until you see the final screen, which shows you which tests you have passed and what your score is.
Let’s break down this page a bit: on the right side of the page, you can see an overview with your current autograder score, along with the tests that you have passed. In the passed tests list, you see the part 1 test case. In the failed tests list, you see the part 2 tests, which makes sense since we haven’t done part 2 yet!
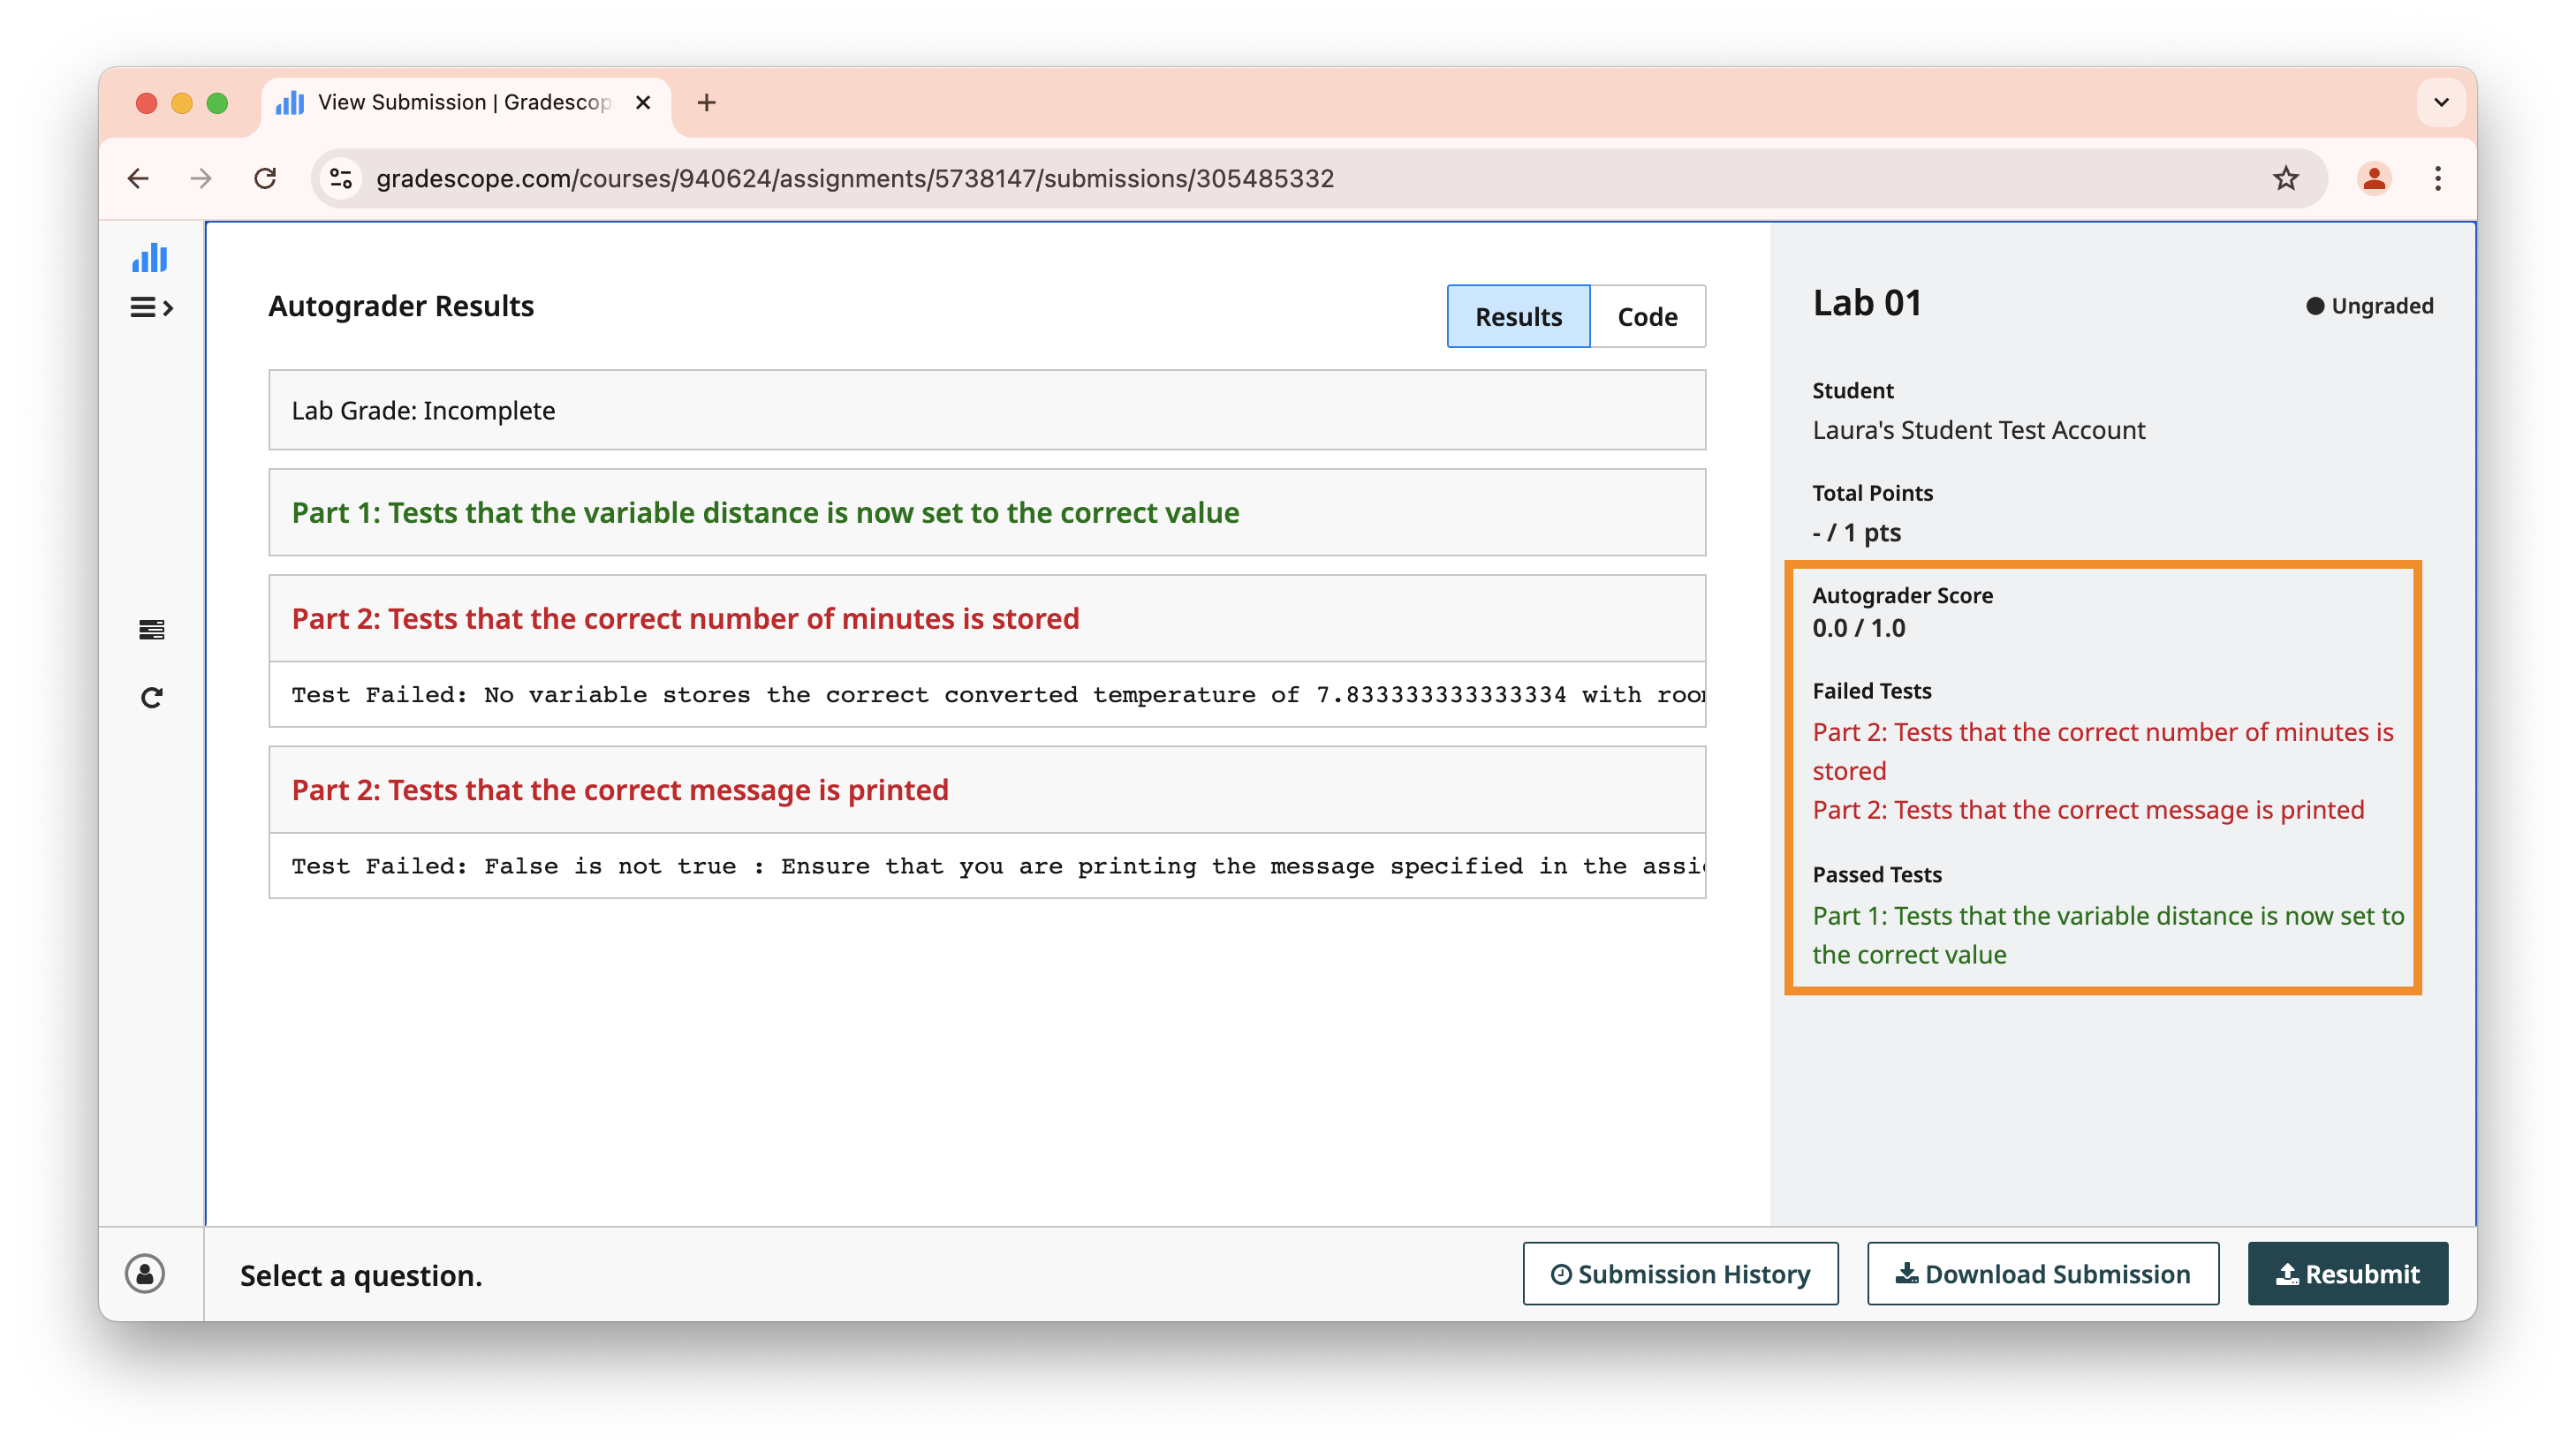
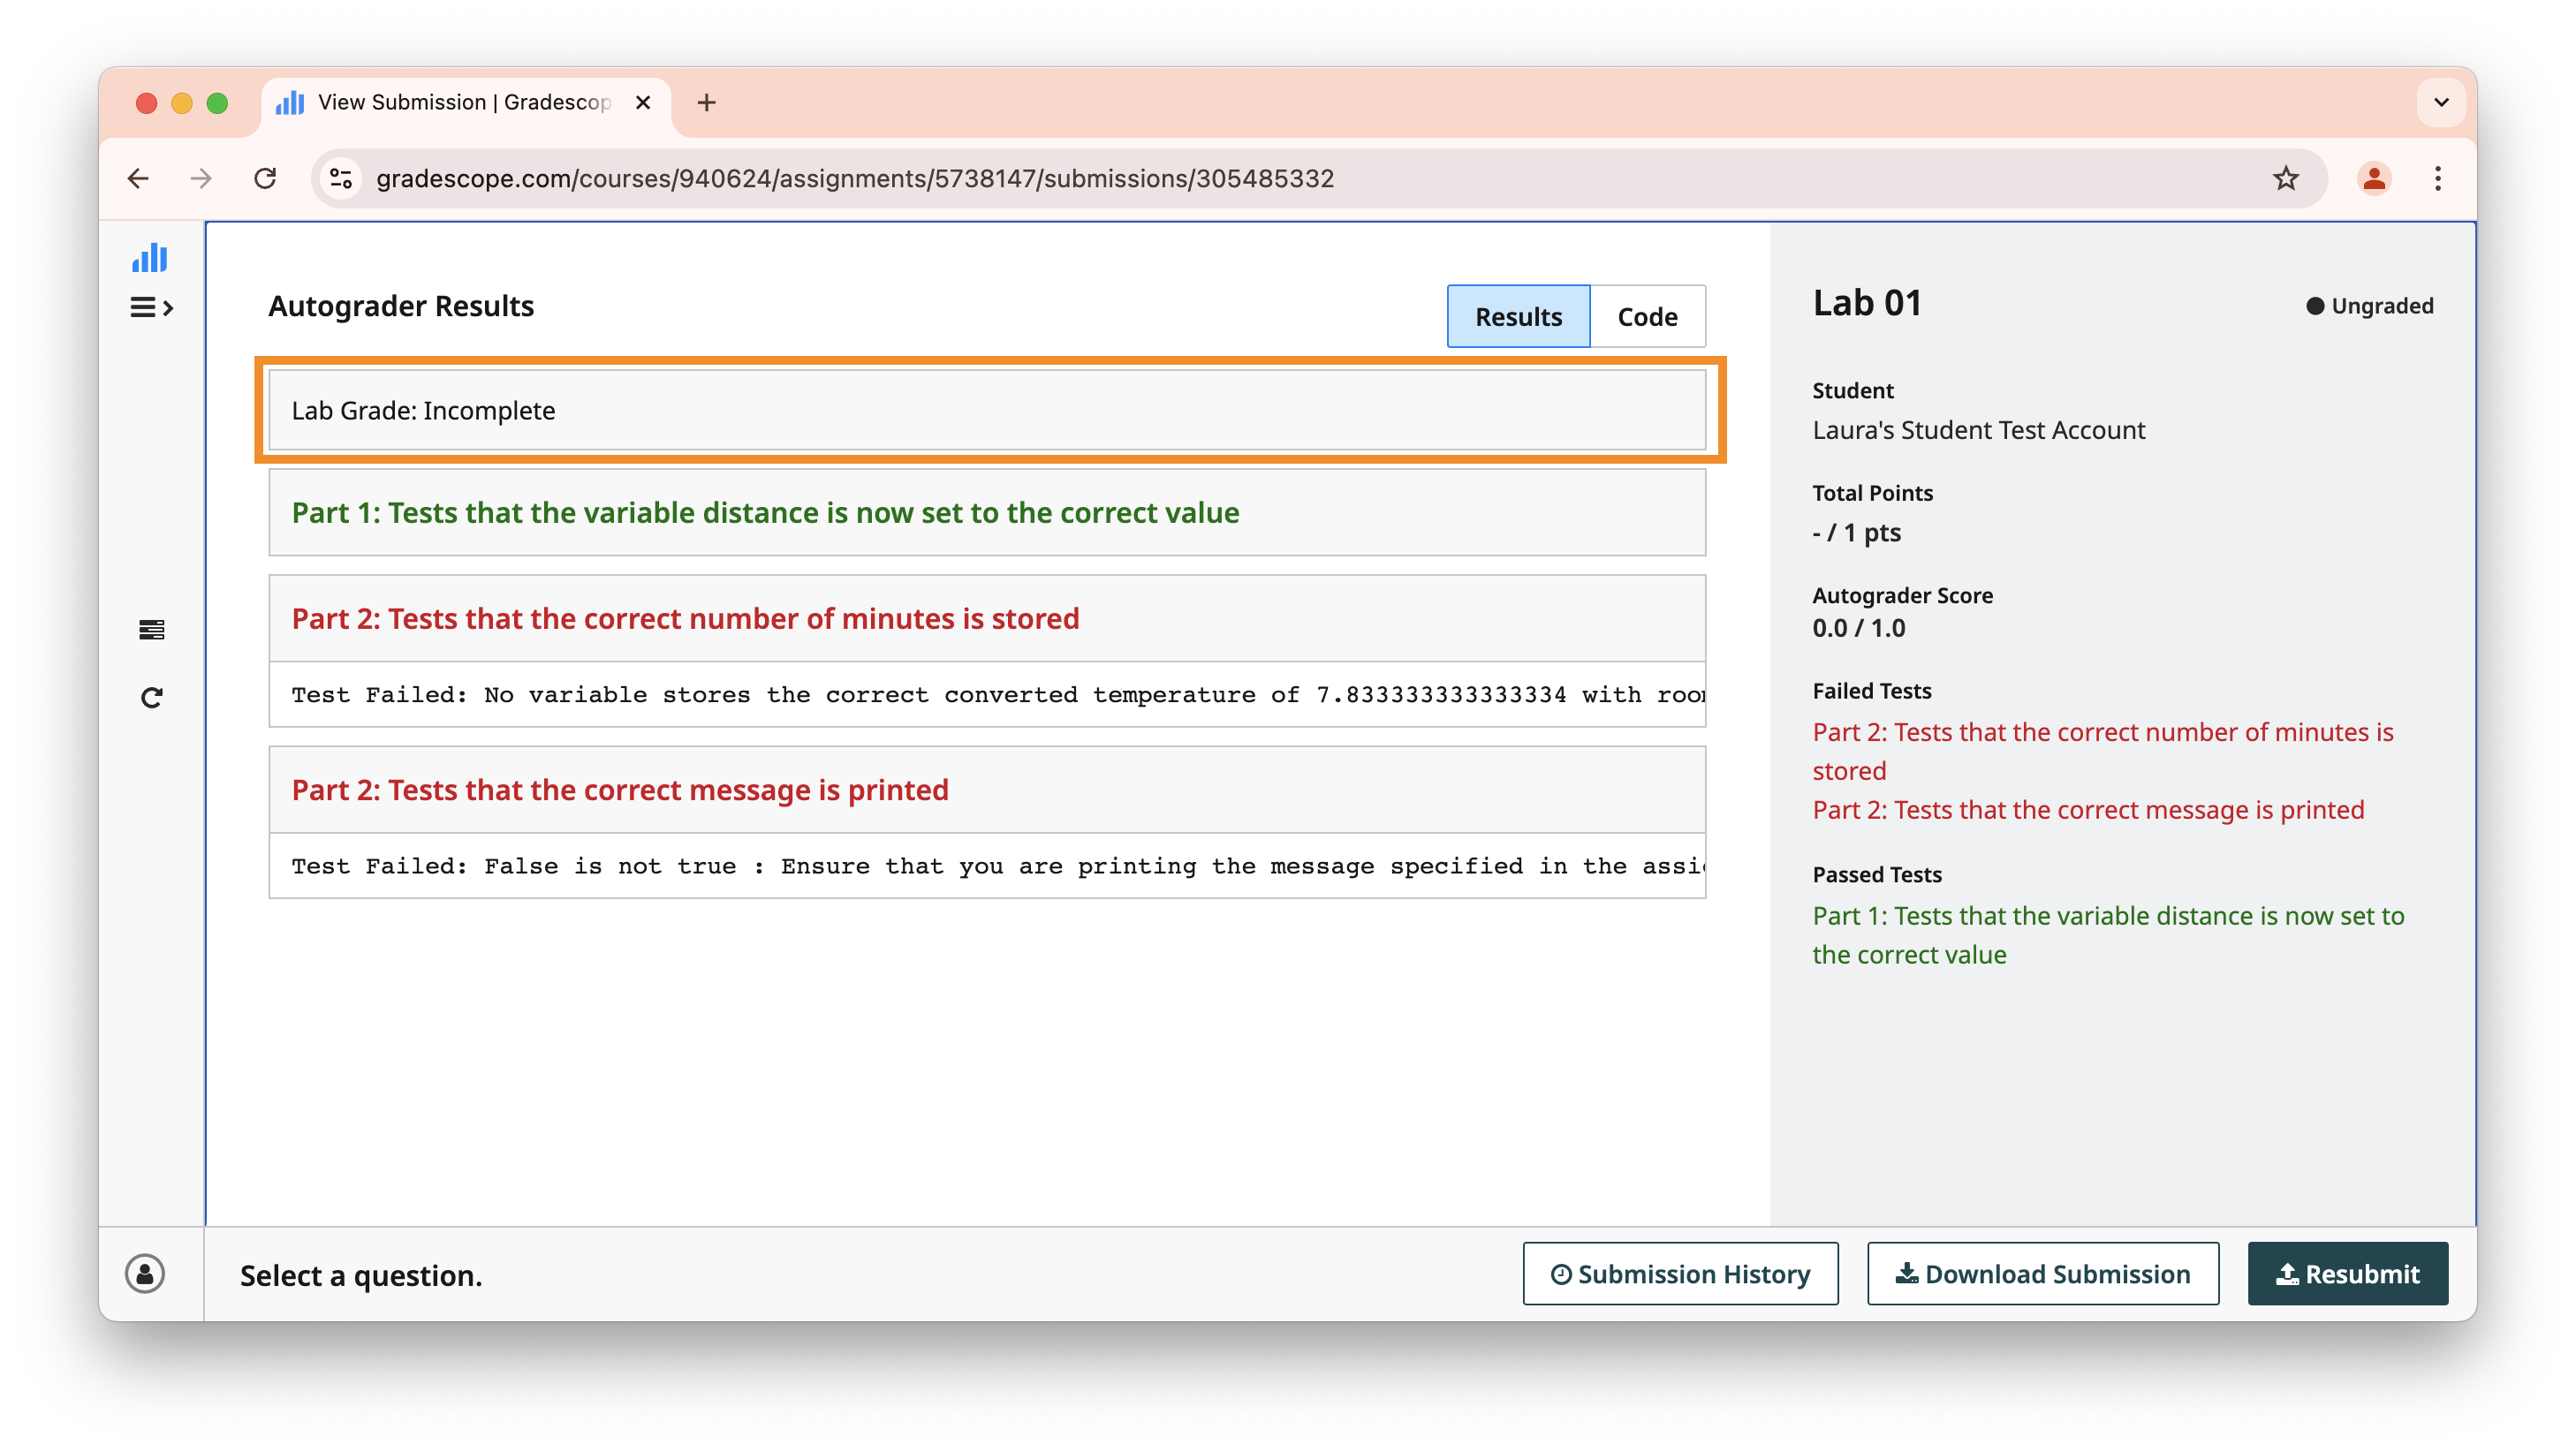
On the top of the left side of the page, you can see your current grade, which will be either satisfactory or incomplete.
Below the grade, you can see detailed information about each test case. In particular, this might give you some helpful information about why certain test cases are failing.

Click the blue “Submit on Gradescope” button at the top of the page to be taken to the gradescope assignment, and wait to see your feedback. Do you see that the part 1 test is passing? If not, read the details on the left side of the page. Hoepfully that will help you to figure out what you need to fix. If you’re still confused, ask an instructor for help! You should make sure that you are passing that test before moving on to the next part.
Part 2: Baking something?
For part 2 of this lab, you will have to come up with an algorithm that allows you to calculate how long it would take to preheat the oven to bake something.
Unfortunately (or fortunately, depending where you are from) the controls for the oven are in degree Celsius but the cookbook that you are using is in degree Fahrenheit so you will need to do some conversions!
Open lab01_part2.py in Thonny, then read the rest of the assignment below to get started!
Facts:
- The current room temperature is 20 degree Celsius
- The oven can heat up 20 degree Celsius for each minute (heating rate)
- We want to reach a temperature of 350 degree Fahrenheit
Question:
- How long will it take to preheat the oven?
Requirements:
Combine your known facts using expressions to calculate the time (in minutes) that it will take to preheat the oven.
The final result should be assigned to a variable (more about naming your variables in the suggestions). It should be a float representing the exactly how long it will take to preheat the oven.
The final result should also be printed, in the format specified below:
The oven will take ____ minutes to preheatWhere
____is filled in using the value assigned to your variable. Think a little bit about how to print something with this level of complexity. You will need to use string concatenation (+) to combine strings together, but… the result is a float, not a string! Therefore, in your print statement, you will need to use thestrfunction to convert the value to a string.Using
printstatements to check values as you go is a good practice, but because of the way our autograder works, you will need to remove any extraprintstatements other than the final one before you submit.
Suggestions:
- Think about the problem on paper first. Make a plan: what do you need to do? What needs to be converted? How do you need to combine the data that you have in order to find the time?
- You should create variables with meaningful names to store your known values (we have created one for you to give you an idea of what we mean by “meaningful names”) and use them in your expression(s):
- The room temperature
- The preheating temperature that we want to reach
- The heating rate
- If the final expression is too long or complicated, consider leveraging the power of variables to perform intermediate calculations
- A piece of information that you might find useful is the conversion between the units: \(\degree\text{C} = (\degree\text{F} - 32) \div \frac{9}{5}\).
Finishing Up
One you are done, submit both files to gradescope and ensure that you have passed all of the tests.