Homework Seven
Due 2025-04-17 at the start of class
Submit on GradescopeObjectives
- Demonstrate your ability to create images from a grid of pixels
- Demonstrate your ability to modify images
- Demonstrate your ability to work with two-dimensional data and nested loops
Getting started
For this assignment, we have another four functions for you to write. Please pay attention to all of these instructions. Even this front matter, which may look the same (and many of you skip over) has changed.
For this assignment, there is no starter code – so create a new file called homework07.py for your work.
Feel free to work through the functions in any order. Whatever order you use, we suggest that you take the time to test each one as you go rather than trying to write all four out like they were part of an essay and then testing at the very end. Treat these are four totally separate and distinct problems (which they are).
Submit your solution on Gradescope using the button above. Feel free to resubmit as your complete each problem to check your progress. To repeat – you only need to submit homework07.py.
Images
All of these problems deal with images. Make sure you have read through Working with Images and have the midd_media package installed.
Python subset
For this assignment, we have not placed any restrictions on what you may use.
Satisfactory vs. Excellence
A solution for these questions that is excellent will have the all of the following qualities
Style
An excellent function will have a docstring that is formatted in the way shown in the lectures. It should include:
- the purpose of the function
- the type and purpose of each parameter (if any)
- the type and meaning of the output (if any)
In addition, you should follow some of the PEP8 guidelines on whitespace. The ones we will be looking at are:
- no whitespace between names and
(or[(e.g.,f (5)should bef(5)ands [3:5]should bes[3:5]) - there should be a single space around operators (e.g.,
x=4+1should bex = 4 + 1andy = 3 -2should bey = 3 - 2) - there should be a space after commas, but not before (e.g.,
f(4 , 5)orf(4,5)should bef(4, 5))
Special cases and requirements
For some of the problems, we have identified special cases or requirements that we have deemed potentially more challenging and not essential to a satisfactory solution. An excellent solution will cover all cases. These cases will be identified in the autograder by tests with * at the end of the title (so make sure you submit frequently as you are working).
Problem 1: Gradient
Write a function called gradient that takes in an width and height as input and returns a new MiddImage with that displays a greyscale gradient, going from black on the left side of the image to white on the left side of the image.
Your gradient should be made up of lines from the top to the bottom of the image in each shade of grey, and your image should be a greyscale image in the mode "L".
gradient
|
|||||
|---|---|---|---|---|---|
| Parameters |
|
||||
| Return type |
MiddImage
|
||||
Examples
>>> gradient(10, 10).show()Should display the following 10x10 image: 
>>> gradient(1000, 500).show()Should display the following 1000x500 image: 
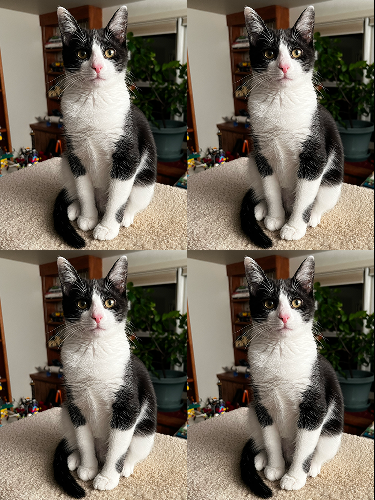
Problem 2: Four-up
Write a function called four_up that takes in an image (img) and returns a new image of the same size that has four \(\frac{1}{4}\) size version of the image tiled on it.
In the lab, you learned how to shrink the image through averaging. For this problem you do not want to do that. Use the pixel skipping method instead.
four_up
|
|||
|---|---|---|---|
| Parameters |
|
||
| Return type | MiddImage | ||
Examples
>>> tiled_img = four_up(img)
>>> tiled_img.save("tiled.png")
The example is using save, so we can show you the files produced by these examples. You can just use show() while you are testing.
![]()
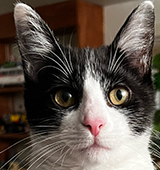
Problem 3: Crop
Write a function called crop which takes five inputs: img (middimage.Image), x (int), y (int), width (int) and ’height (int). Your function should return a new image that is a widthxheight crop from the original img with its upper left corner at (x, y). So, for example, crop(img, 10,10, 25, 25) would return a new image that was 25x25 and contained a copy of the pixels of the original image with x values from \([10, 35)\) and y values from \([10, 25)\). Calling crop(img, 0 ,0 , img.width, img.height) should return a copy of the original image.
If the crop rectangle does not fully overlap the original image, the pixels that fall outside of the source image should be set to middle grey (127 or (127, 127, 127)).
crop
|
|||||||||||
|---|---|---|---|---|---|---|---|---|---|---|---|
| Parameters |
|
||||||||||
| Return type | MiddImage | ||||||||||
Examples
>>> c1 = crop(img, 100, 10, 160, 170)
>>> c1.save("crop1.png")
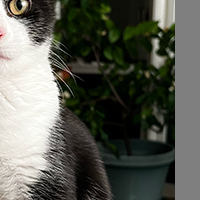
>>> c2 = crop(img, 200, 100, 200, 200)
>>> c2.save("crop2.png")The example is using save, so we can show you the files produced by these examples. You can just use show() while you are testing.
![]()
Problem 4: Frame
Write a function called frame that takes in an img, width, and hex_color as input and returns a new MiddImage with the result. Your function should put a frame of width pixels around the original image, which should be placed in the center. The full image should be included in the new framed image, so the image returned by the frame function should be larger than the original. The color of the frame will be specified in a hex string, e.g., #FF00FF represents magenta. The first FF is the R value, the 00 is the G value, and the second FF is the B value. The hex string will always start with a # and be followed by six characters.
You can use the second optional argument of the int function, base, to convert from hex to an integer. For instance, int("FF", 16) returns 255.
Although it will make your code more complex, an excellent solution will only set the value for each pixel once, rather than writing and then overwriting pixels.
frame
|
|||||||
|---|---|---|---|---|---|---|---|
| Parameters |
|
||||||
| Return type |
MiddImage
|
||||||
Examples
>>> img = middimage.open("rita.jpg")
>>> framed = frame(img, 10, "#FF00FF")
>>> framed.show()
Should display the following image: 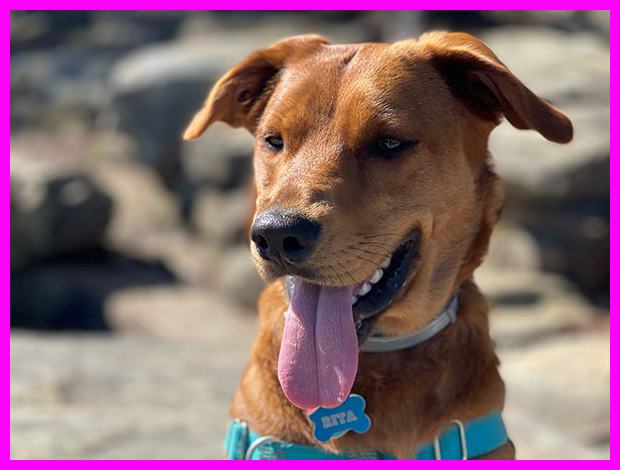
>>> lines = middimage.new(5, 5)
>>> for x in range(0, lines.height, 2):
        for y in range(lines.width):
            lines[x][y] = (255, 255, 255)
>>> framed = frame(lines, 2, "#00FF00")
>>> framed.show()
Should display the following image: 