Homework Nine (retake)
Due 2025-05-12 at 11:59p
Download Starter Files Submit on GradescopeObjectives
- Demonstrate your ability to create a class
- Demonstrate your ability to add methods to a class
- Demonstrate your ability to create a system of connected classes
Getting started
For this assignment, there are only two parts. We have provided you with some starter code and some image files, so make sure to download it before you dive in.
Submit your solution on Gradescope using the button above. Feel free to resubmit as you complete each problem to check your progress. You only need to submit homework09r.py, we don’t need the asset directory.
Python subset
For this assignment, we have not placed any restrictions on what you may use.
Satisfactory vs. Excellence
A solution for these questions that is excellent will have the all of the following qualities
Style
An excellent function will have a docstring that is formatted in the way shown in the lectures. It should include:
- the purpose of the function
- the type and purpose of each parameter (if any)
- the type and meaning of the output (if any)
In addition, you should follow some of the PEP8 guidelines on whitespace. The ones we will be looking at are:
- no whitespace between names and
(or[(e.g.,f (5)should bef(5)ands [3:5]should bes[3:5]) - there should be a single space around operators (e.g.,
x=4+1should bex = 4 + 1andy = 3 -2should bey = 3 - 2) - there should be a space after commas, but not before (e.g.,
f(4 , 5)orf(4,5)should bef(4, 5))
Special cases and requirements
For some of the problems, we have identified special cases or requirements that we have deemed potentially more challenging and not essential to a satisfactory solution. An excellent solution will cover all cases. These cases will be identified in the autograder by tests with * at the end of the title (so make sure you submit frequently as you are working).
Background
The goal of these problem is to finish implementing “Froggy”, a simplistic version of Frogger.
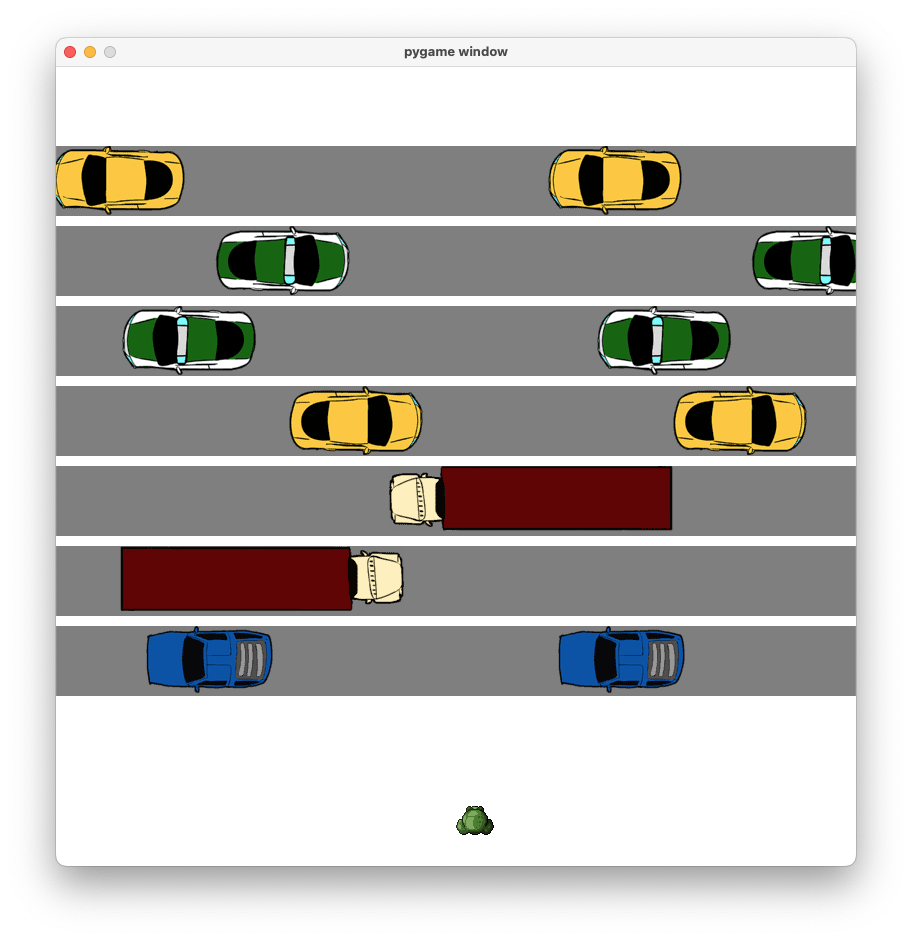
Frogger is a classic video game that involves getting a frog from the bottom of the screen to the top. In the original, the frog has to first navigate multiple lanes of traffic, then it has to hitch rides on floating logs and turtles to ultimately make it home. We are going to simplify this considerably. In our version, the frog still needs to make it from the bottom of the screen to the top, but we have expanded out the lanes of traffic and removed the swamp portion.
In keeping with the original, each lane of traffic consists of a single type of vehicle and that moves at a fixed rate, with random distances between the vehicles. Each lane moves at a different, randomly chosen rate, Every other lane runs in the opposite direction.
The player navigates the frog using the arrow keys. Up, moves the frog forward, towards the top of the screen, down moves the frog back towards the bottom, the right and left arrows move the frog left and right respectively. Note that these controls are with respect to the screen – not the frog, who will turn in the direction of its last hop.
We have provided you with a partial implementation that you will complete over the following two problems. You should take a moment to read through the provided code before you begin. You should detect the DNA of our asteroids example in here.
Part 1 - Implement the Frog
The frog is our avatar. It will hop around the screen as the player types the arrow keys. Each key press will make it hop in one of the four directions. I have provided a collection of different images, so as you move the frog, it should look like it is hopping in the chosen direction and it will come to rest facing the direction it just hopped.
Create a new class called Frog. In addition to __init__(), your Frog class will have three other methods: jump, update and display, and it will have properties sprites, direction, rect, and jump_distance.
The Frog works similarly to the Ship we created in class, however, there are some key differences. The Frog will hav a collection of sprites that it will switch between depending on which way it is facings (direction) and whether it is resting or jumping. Like the Ship, it will react to key events, but not continuously. Instead, we will tell it to jump in one of four directions, and while it is jumping, it won’t listen to any commands.
Start by creating the class and the methods without implementing them. Then uncomment all of the lines in Scene that say to uncomment them once you have a Frog. That will allow you to run the code to test as you go.
__init__
The __init__ method will set up the various properties of the Frog. The most important part of this is to load all of the images. The images can be found in the assets directory. There are eight different images to load. All of the images have the form “frog_action_direction.png” where action is either “rest” or “jump” and the direction is one of “forward”, “backward”, “left”, “right”. You should load all of these into a dictionary stared as self.sprites. The keys of the dictionary should be of the form “action-direction”, So asking for self.sprites["jump-left"] should return the image of the frog jumping to the left.
Set self.rect to the rect of self.sprite["rest-forward"] (recall that you can get the Rect for an image with the get_rect() method). Update the x and y coordinates of the rect to be the x and y that were passed in as parameters.
Set self.jump_distance to 0. This value represents how much farther is left to the frog’s jump. At the moment it is resting, so that is 0.
jump
If the current jump_distance is 0 (i.e., the frog isn’t already in mid-jump), set the frog’s direction to the input direction and set the jump_distance to ROAD_WIDTH.
update
As before, this method is what will actually make the frog move. If the jump_distance > 0, then move the frog (update its rect) by TRAVEL_AMOUNT in the direction indicated by self.direction, then reduce the jump_distance by that amount. Use the technique we used previously to keep the frog on the screen.
display
Pick the sprite that matches the frog’s current direction and activity and display it.
Frog
|
|||||||||
|---|---|---|---|---|---|---|---|---|---|
| Properties |
|
||||||||
Frog.__init__
|
|||||
|---|---|---|---|---|---|
| Parameters |
|
||||
Frog.jump
|
|---|
direction
|
string
|
Frog.update
|
|---|
Frog.display
|
|---|
surface
|
pygame.Surface
|
Part 2
For the second part of the implementation, you will work on implementing the Road class. We have already provided you with a partial implementation. Your task will be to complete the implementation of the __init__ and update methods.
In Frogger, a road is a horizontal strip in which vehicle travel across the screen, providing obstacles the frog is trying to avoid. Every other road alternates in direction. On each road, we only have one type of vehicle, and they all travel at the same rate, separated by gaps of random widths. Your task is to make sure we have a continuous stream of traffic on all roads.
__init__
We have already started the __init__ method for you and established the key properties of the class. Note that the Scene object will have chosen a random speed as well as the sprite to use for all of the vehicles on this road. The speed will determine the direction of travel and the sprite will have been chosen to be facing in the correct direction.
Your job is to populate the self.vehicles property with Vehicle objects (which we have also provided for you). You should create four vehicles that we will continuously recycle.
Start by placing the first Vehicle against the edge of the screen it is facing. In other words, the cars driving to the right should be just about to drive off the right edge of the screen, while the cars driving to the left should be just about to drive off the left side of the screen. For the remaining three vehicles, they should be placed so they are behind the vehicle in front of them with some gap in between them. The gap should be between one and three times the width of the sprite.
Some things to bear in mind:
- the
speedwill tell you which direction the vehicles are moving - the
sprite_widthproperty allows you to know the width of all of the sprites on thisRoadwithout having to actually have aVehicleor sprite to hand. - no matter which direction the vehicle appears to be going,
x,ystill refers to the upper left-hand corner - “behind” is based on the direction the vehicle is facing so you will need to figure out if you are adding or subtracting
- the
Rectobject, in addition to thex,y,width, andheightproperties, we also havetop,bottom,right, andleft, and these can be set directly to reposition the rect.
If you test at this point, the vehicles will all appear on the screen.
update
The update method is responsible for telling the vehicles to move. Start by iterating over the Road’s vehicles and updating them by the speed.
The second thing you need to do is handle the vehicles that have left the screen. Since the vehicles are in order, the only one we have to deal with is the first vehicle in the list.
Start by checking to see if the vehicle is fully off screen. You will need to check which direction the vehicle is moving to know which edge you should be checking.
If the vehicle is off screen, pop it from the front of the list. Update the vehicle’s rect property so it is behind the last vehicle in the list (with a random gap – same as above). Add the vehicle back onto the list at the end.
Ideally, we don’t want our recycled vehicles popping up in the middle of the road. They should always start off screen, even if that is more than the three widths. An Excellent solution will make sure that this property is held.
If you get this right, you will now have a playable (if simplified) game not unlike Frogger.