Homework 6
Objectives
- Transform the colors and the size of an image with nested loops
- Write classes whose objects hold other objects
- Write methods that change an object, and call one object’s methods from another’s
In the first half you’ll turn your own photo into a Warhol-style print. In the second half you’ll write two classes that draw pictures with the turtle. The homework builds on Lecture 17 (images), Lab 5 (adjust, mirror, and Rect), Lecture 18 (classes), and Lecture 10 (turtle).
Read the whole writeup before you start. Then write one function or method at a time, and test each one before moving on.
Part 0: Setup
Click “Download Starter Code” above to download hw6.zip. Move it to your cs145/homework folder, then extract it (Mac: double-click it; Windows: right-click it and choose “Extract All…”) to create a hw6 folder with these files:
hw6_images.pyis where you write your image functions (Parts 1-3). It gives youluminance(from class) andprint_pixels(from Lab 5), and a docstring for each function you write.hw6_drawing.pyis where you write your classes (Parts 5-6), with a docstring for each method. It also gives you the classShape(Part 7).eggs.jpgis a photo for trying out your functions.make_warhol.pymakes your Warhol print (Part 4).prepare_photo.pyprepares a photo of your own asmyphoto.jpg.drawings/has five drawings for Part 7.
At the bottom of each .py file you write in, inside if __name__ == "__main__":, there are commented-out tests with the expected output. Uncomment each test once you’ve written that part, and keep the tests inside that block. Keep all the files in the same folder.
Your photo: choose a photo of your own (one you took, or any image you like) and save it in your hw6 folder as myphoto.jpg, a JPEG about 800 pixels on the longer side. Either follow Preparing your own photos, or open prepare_photo.py in Thonny, run it, and choose your photo: it saves myphoto.jpg in your hw6 folder for you.
Part 1: pick_color
The idea of posterizing is to reduce the colors in an image to a small handful, called a palette. Famous examples include Andy Warhol’s silkscreen prints of people like Marilyn Monroe and Shepard Fairey’s Obama “Hope” poster. In those, the look comes from choosing a few inks for the silkscreen; we can make our own version by restricting our palette.
An artist might think carefully about where each color goes. We’ll simply choose each pixel’s color by its luminance: dark pixels get the first color in the palette, bright pixels get the last, and pixels in between get the colors in between.
First, complete pick_color(lum, palette), which takes a luminance (0 to 255) and a list of colors, and returns the color for that luminance. Split the 256 possible luminances into len(palette) bands of equal width. For a palette of 3 colors, each band is 256 / 3 ≈ 85.3 luminances wide:
| Luminance | Color |
|---|---|
| 0 to 85 | palette[0] |
| 86 to 170 | palette[1] |
| 171 to 255 | palette[2] |
The band edges fall at 85.3 and 170.7, so 85 is in the first band and 86 in the second. For 2 colors, the bands are 0 to 127 and 128 to 255. Your function should work for a palette of any length.
- Work out the index of
lum’s band. Ask: how many whole bands fit belowlum? - Return the color at that index.
Test it on the edges of the bands, where mistakes show up: 0, 85, 86, 170, 171, and 255 for 3 colors.
>>> %Run hw6_images.py
>>> palette = [(0, 0, 0), (255, 0, 0), (255, 255, 255)]
>>> pick_color(85, palette)
(0, 0, 0)
>>> pick_color(86, palette)
(255, 0, 0)
>>> pick_color(255, palette)
(255, 255, 255)
This function takes about 2 lines.
Part 2: posterize
Now complete posterize(img, palette). It returns a new color image the same size as img in which each pixel is the palette color for that pixel’s luminance. It does not change img. Use luminance and pick_color: the loops look just like adjust’s in Lab 5.
As in Lab 5, test on a tiny image first, where you can check every pixel by hand with print_pixels. Here is a 3 by 1 image with the palette from Part 1:
>>> tiny = middimage.new(3, 1)
>>> tiny[0][0] = (200, 100, 51)
>>> tiny[1][0] = (10, 20, 30)
>>> tiny[2][0] = (255, 255, 255)
>>> palette = [(0, 0, 0), (255, 0, 0), (255, 255, 255)]
>>> print_pixels(posterize(tiny, palette))
[(255, 0, 0), (0, 0, 0), (255, 255, 255)]
>>> print_pixels(tiny)
[(200, 100, 51), (10, 20, 30), (255, 255, 255)]
The first pixel’s luminance is 117, in the middle band, so it becomes red. The last call checks that posterize didn’t change tiny. Once your function works on tiny images, try it on a photo:
>>> img = middimage.open("eggs.jpg")
>>> palette1 = [(0, 49, 79), (187, 21, 27), (114, 151, 160), (215, 210, 170), (255, 230, 170), (255, 255, 255)]
>>> posterize(img, palette1).show()
>>> palette2 = [(0, 0, 0), (255, 255, 255)]
>>> posterize(img, palette2).show()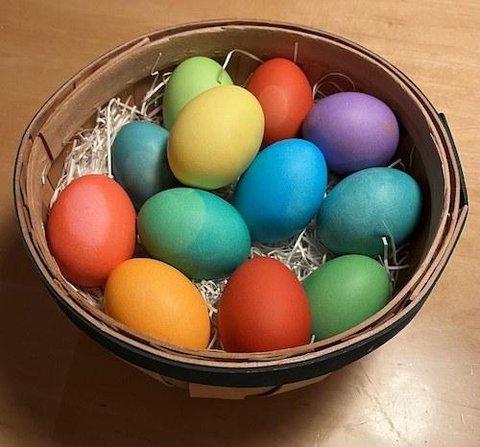
eggs.jpg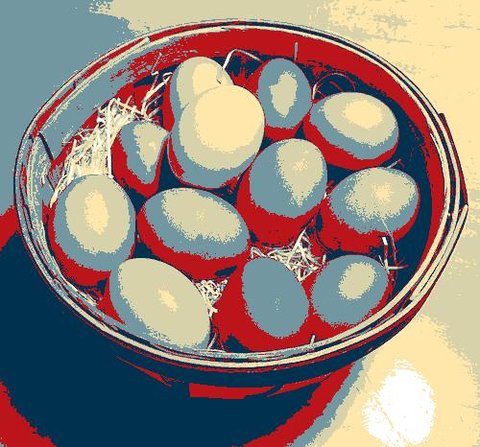
posterize(img, palette1)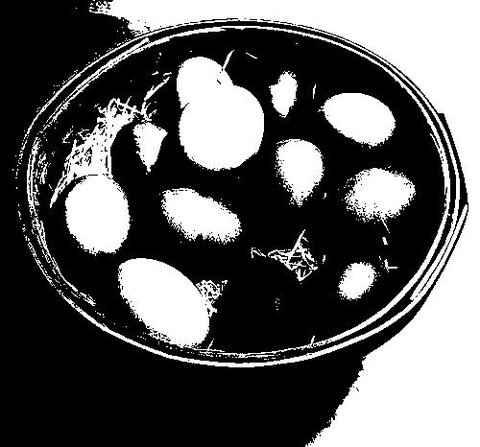
posterize(img, palette2)This function takes about 5 lines.
Part 3: shrink
Complete shrink(img, factor), which returns a smaller copy of a color image: factor times smaller in each direction. It does not change img.
The simplest way to shrink is to keep every factor-th pixel and skip the rest. Here is an 8 by 8 image shrunk by a factor of 2. The image is gray stripes with three red pixels:
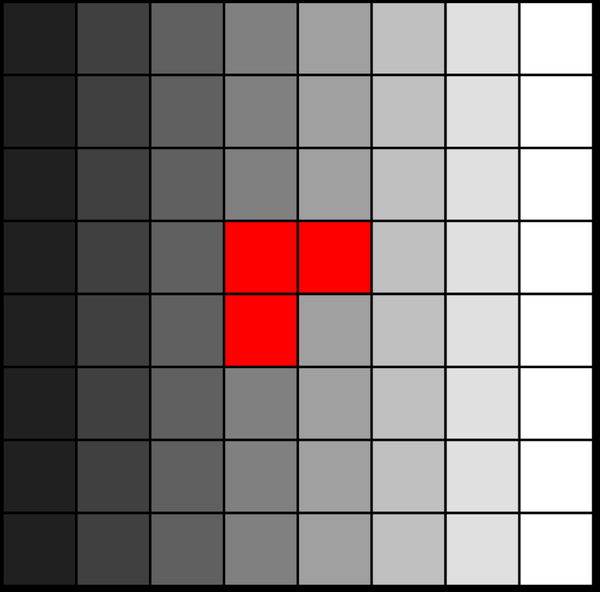
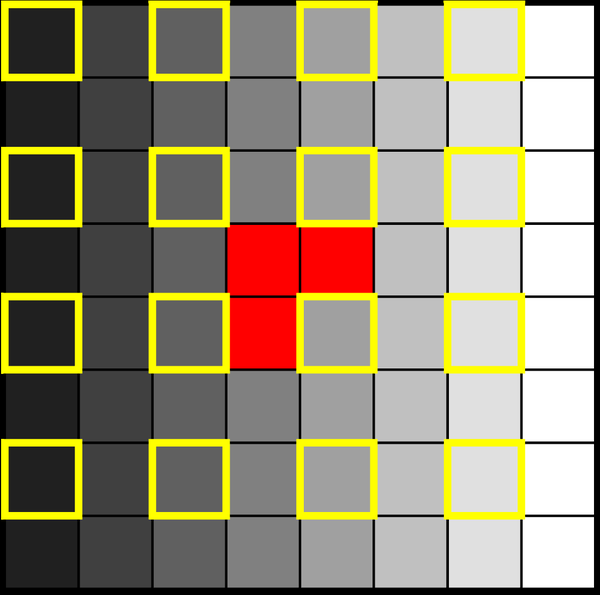
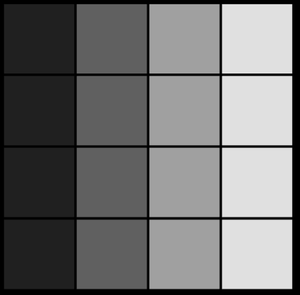
Pixel (x, y) of the result is pixel (x * factor, y * factor) of img. All three red pixels were skipped, so the result is all gray.
- Make a new color image with
middimage.new:img.width // factorwide andimg.height // factortall. Use//because sizes must be integers. If the size doesn’t divide evenly, the leftover pixels at the right and bottom are dropped. - Loop over every pixel of the new image, not
img. - Set each pixel of the new image to the matching pixel of
img. - Return the new image.
Test it on a tiny image 4 pixels wide and 2 tall. Shrinking by 2 keeps pixels (0, 0) and (2, 0), so the green pixel at (3, 1) is skipped:
>>> tiny = middimage.new(4, 2)
>>> tiny[0][0] = (255, 0, 0)
>>> tiny[2][0] = (0, 0, 255)
>>> tiny[3][1] = (0, 255, 0)
>>> small = shrink(tiny, 2)
>>> small.width, small.height
(2, 1)
>>> print_pixels(small)
[(255, 0, 0), (0, 0, 255)]
Then try a photo:
>>> img = middimage.open("eggs.jpg")
>>> small = shrink(img, 4)
>>> small.width, small.height
(125, 116)
>>> small.show()
This function takes about 5 lines.
Skipping pixels can lose details, like the red pixels above. A better shrink sets each new pixel to the average of the factor by factor block of pixels it replaces:
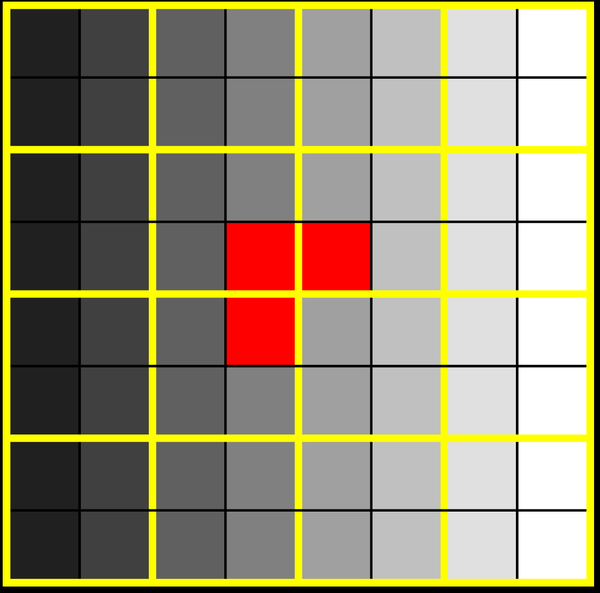
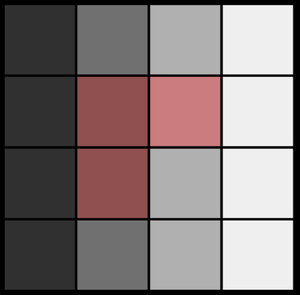
Write shrink_average(img, factor). For each new pixel, add up the red, green, and blue values in its block with two more nested loops, then divide each sum by factor * factor. Not tested.
Part 4: Your Warhol print
Andy Warhol’s best-known prints repeat one photo in a grid, each copy in its own bright colors. make_warhol.py does that with your functions: it shrinks your photo by 2, posterizes it with four palettes, and puts the four copies in a 2 by 2 grid.
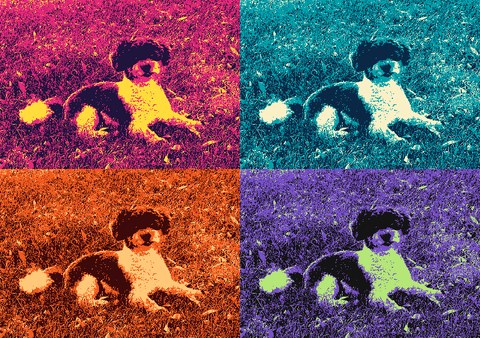
laurie.jpg from Lab 5- Experiment with palettes on
eggs.jpgand on your photo. Tools like coolors and Adobe Color help you pick colors that work together; list them from darkest to lightest. - Open
make_warhol.pyand changePALETTESat the top to four palettes of your own. - With
myphoto.jpgin yourhw6folder, type this in the Thonny Shell:
>>> %Run make_warhol.py
Saved warhol.png
make_warhol.py checks your photo first. If it’s too big, isn’t a color image, or is eggs.jpg, it tells you what to fix.
Part 5: The Point class
In the rest of the homework, you’ll write two classes in hw6_drawing.py: a Point, and a Segment made of points. The provided class Shape reads a drawing from a file into segments and draws it.
hw6_drawing.py imports the turtle as t, as in Lecture 10. In your classes, use only these four turtle functions, so that Gradescope can check your drawing: t.goto, t.dot, t.up, and t.down.
Test your classes with the tests at the bottom of hw6_drawing.py: uncomment them and run the file. Anything printed appears in the Shell, and the drawing in the turtle window. The file ends with t.done(), so close the turtle window before you run it again.
In the turtle window, (0, 0) is the center and y grows up, unlike in an image.
Complete the class Point, with two attributes, x and y, and these methods:
__init__(self, x, y)stores its parameters as the attributesself.xandself.y.__str__(self)returns a string such as"Point(10, 20)", likeRectin Lab 5.scale(self, factor)multipliesxandybyfactor. It changes the point and returns nothing.translate(self, tx, ty)addstxtoxandtytoy. It also changes the point and returns nothing.draw(self, withdots)moves the turtle to the point witht.goto. IfwithdotsisTrue, it also draws a dot there witht.dot(). Otherwise, it draws no dot.
p = Point(10, 20)
print(p)                 # Point(10, 20)
p.scale(5)
print(p)                 # Point(50, 100)
q = Point(20, 30)
q.translate(15, 25)
print(q)                 # Point(35, 55)
p.draw(False)
q.draw(True)
After these lines, the turtle has drawn a line from (0, 0), where it started, to (50, 100), then a line to (35, 55), with a dot only at (35, 55).
Like a list’s .append, scale and translate change the object and return None.
Part 6: The Segment class
A segment is a list of points, drawn as lines from each point to the next. Complete the class Segment, with one attribute, points, and these methods:
__init__(self, points)stores the list ofPointobjects asself.points.scale(self, factor)scales every point in the segment. Call each point’sscalemethod.translate(self, tx, ty)translates every point. Call each point’stranslatemethod.draw(self, withdots)draws the segment: lift the pen witht.up(), so there’s no line from wherever the turtle was to the first point. Then draw each point by calling itsdrawmethod, with the pen down (t.down()) after the first point.
Each Segment method calls a Point method on every point: the segment doesn’t need to know how a point scales or draws itself.
square = Segment([Point(100, 100), Point(200, 100), Point(200, 200),
                  Point(100, 200), Point(100, 100)])
square.draw(True)
You should see a square with sides 100 long and a dot at each corner. The last point repeats the first, to close the square.
Each method takes 1 to 4 lines.
Part 7: Drawing shapes
The provided class Shape reads a drawing from a file. Each line of the file is a point, x y; a line Break ends one segment and starts the next. Shape makes a Point for each line and a Segment for each group of points. Its scale, translate, and draw methods call the same methods on every segment, the way your Segment calls them on every point.
witch = Shape("drawings/witch0.txt")
witch.scale(15)
witch.translate(0, -30)
witch.draw(True)
witch0.txt is a single segment. With withdots True (left) you can see its points; with False (right) you see just the outline:
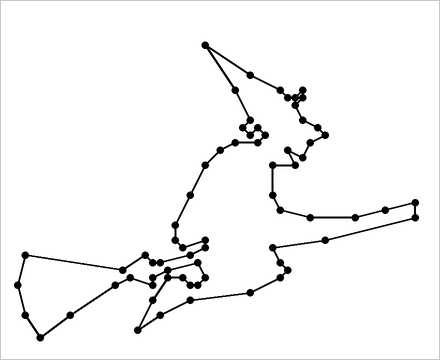
witch.draw(True)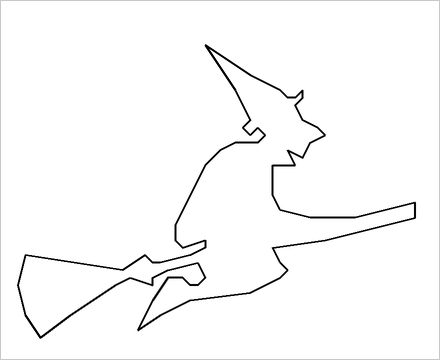
witch.draw(False)The other drawings have several segments. Try them all, with scale factors around 10 to 15:
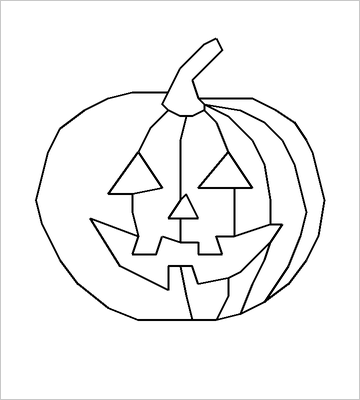
jackolantern.txt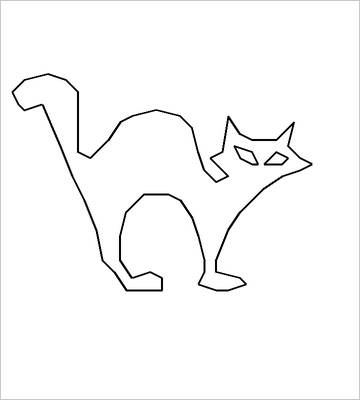
cat.txt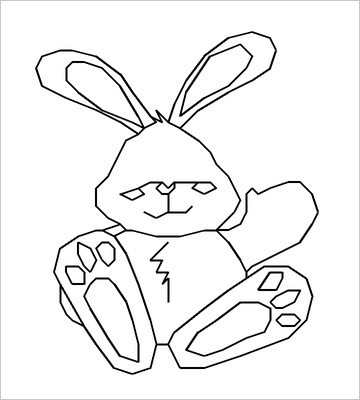
bunny.txtIf you see extra lines joining separate parts of a drawing, check that Segment.draw lifts the pen before the first point.
Specification
At a minimum, your hw6_images.py should have:
- A function named
pick_colorwith two parameters, a luminance and a list of colors, that returns the color for that luminance’s band as described in Part 1. - A function named
posterizewith two parameters, an image and a list of colors, that returns a new posterized image without changing the original. - A function named
shrinkwith two parameters, an image and a factor, that returns a new imagefactortimes smaller in each direction without changing the original, as described in Part 3.
Your hw6_drawing.py should have:
- A class named
Pointwith attributesxandyand methods__init__,__str__,scale,translate, anddraw, as described in Part 5. - A class named
Segmentwith attributepointsand methods__init__,scale,translate, anddraw, as described in Part 6.
Style and Design
- You must add your code to the provided starter files.
- At the top of each file, include your name (
Author:) and the resources you used (included in the starter files). - Keep the docstrings given in the starter files.
- Use the functions and methods you’ve already written instead of repeating their code:
posterizecallsluminanceandpick_color, and eachSegmentmethod calls the matchingPointmethod. - Use only
t.goto,t.dot,t.up, andt.downin your classes. - Follow the Guidelines for Code Quality.
Common issues
Submitting your work
When you are done, submit these three files to Gradescope:
hw6_images.pyhw6_drawing.pywarhol.png
The autograder checks your two .py files (23 points). We review your code style and your warhol.png ourselves (2 points).
Ensure that the upload succeeds and your submission passes all visible tests. Passing all of the visible tests does not guarantee that your submission correctly satisfies all of the requirements of the assignment. We encourage you to submit early and often so you have time to resolve any issues.