Homework 5: Hate Speech Classification with BERT
Running Your Code and Starter Code
You will run your code on the ada cluster. We’ve discussed how to use the ada cluster in class, and if you need a refresher, you can look at the guide.
Rather than downloading starter code as a zip, you should copy the starter code which is already stored on the ada cluster using the following command:
cp -r /home/lbiester/CS457HW/HW5/starter_code/ ~/HW5Remember to also load the CS457 module:
module use /home/lbiester/modules
module load cs457/s25-hw
There are two slurm files the are available for you to schedule jobs:
train_base.sbatch: this file will be used to test the base implementation of your model. Once you’ve implemented theHateSpeechClassificationModelclass and thetrainfunction, you should train your model using this slurm script.train_frozen.sbatch: this file is used to see what happens if you freeze the BERT parameters. Once you’ve implemented the code for thefreeze_bertargument, you should train your model using this slurm script.
In both slurm files, replace <your_email>@middlebury.edu with your actual email to get email alerts!
I am not providing vscode debugger configurations for this assignment, as I want you to make sure that you are testing your scripts on ada’s GPU nodes using the slurm scripts.
Warning
Training your model using these scripts on ada with the full dataset will take a while (20-30 minutes).
Implementation Details
For this assignment, I want you to learn how to train a BERT model for classification without relying on some of the higher level APIs provided by Hugging Face. The Trainer class, the DistilBertForSequenceClassification class, and the AutoModelForSequenceClassification class are not allowed for the purpose of this assignment. You will need to write your own model class extending nn.Module and write your own training loop. There have been examples of this in class, and you should feel free to copy any of those examples and modify them to match the requirements of this assignment. Here are some of the examples:
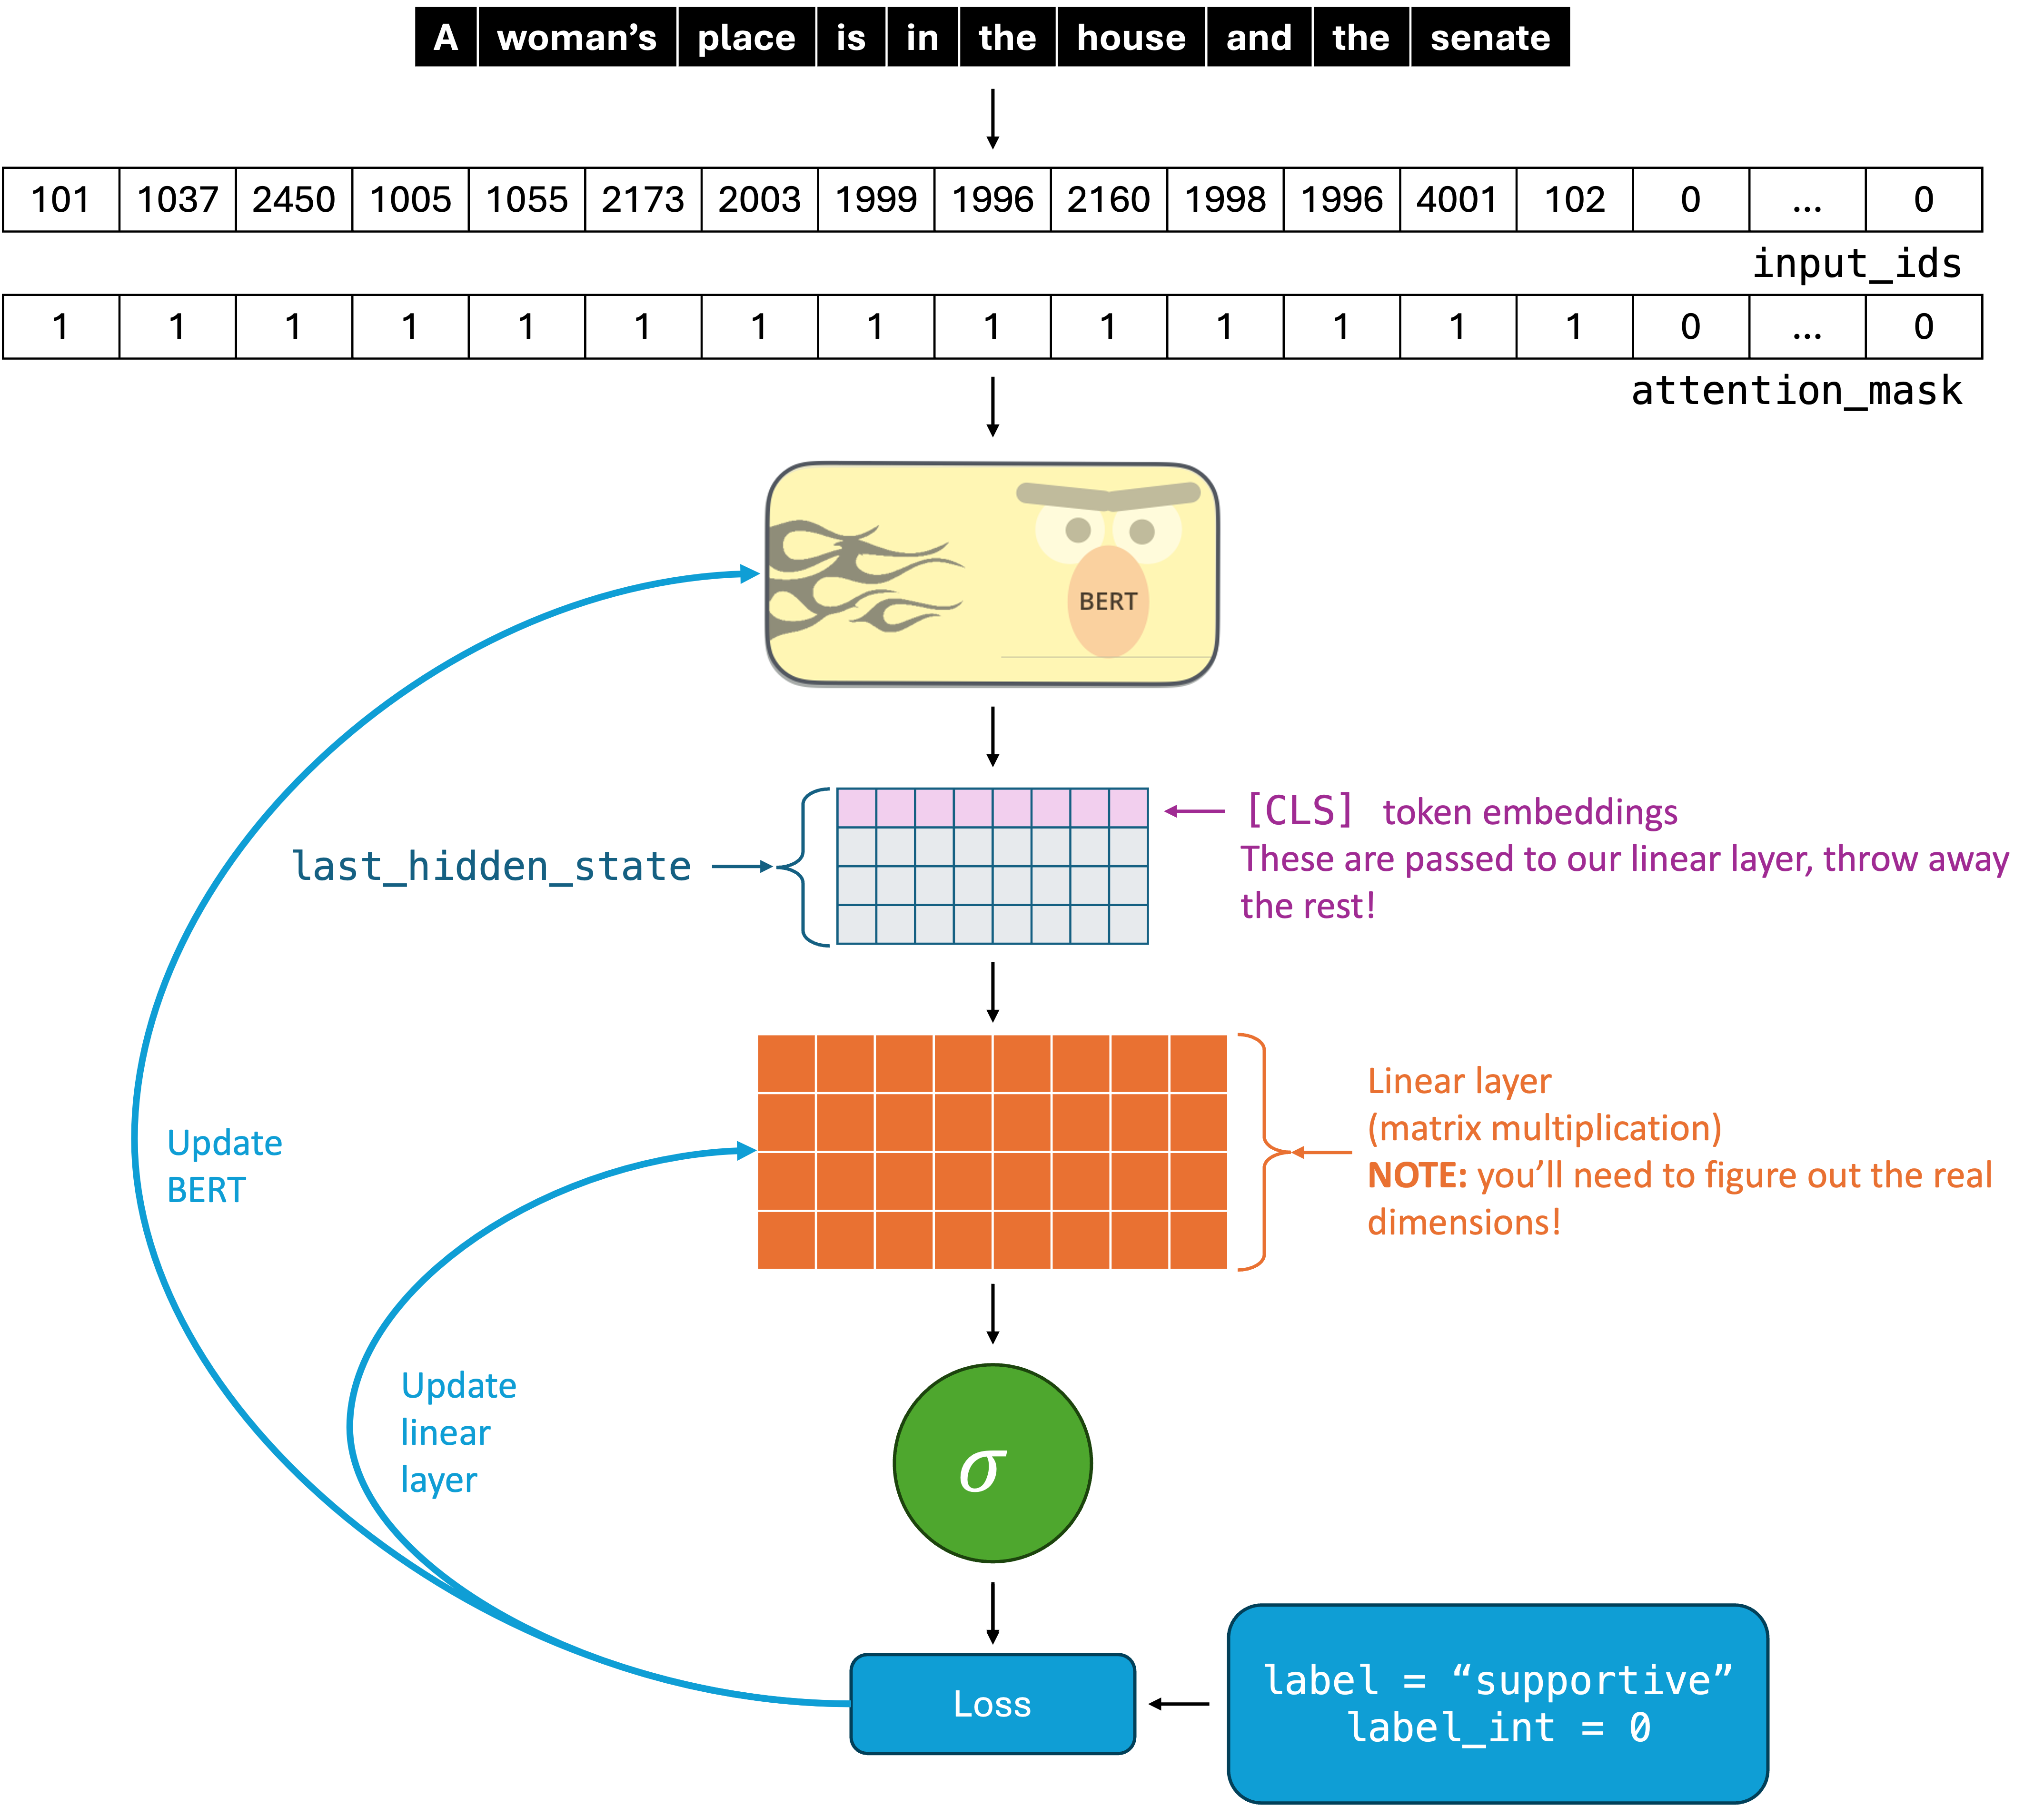
Your goal is to implement a BERT model to classify sentences into the categories “Hateful” or “Supportive”. The diagram below shows a visual representation of the model that you are going to implement. I’ll break down the components of this model and which parts of the code you should be updating to implement each of them below.
Tokenizing
I’ve handled the tokenization (represented by this part of the figure) for you in the get_dataloader function.
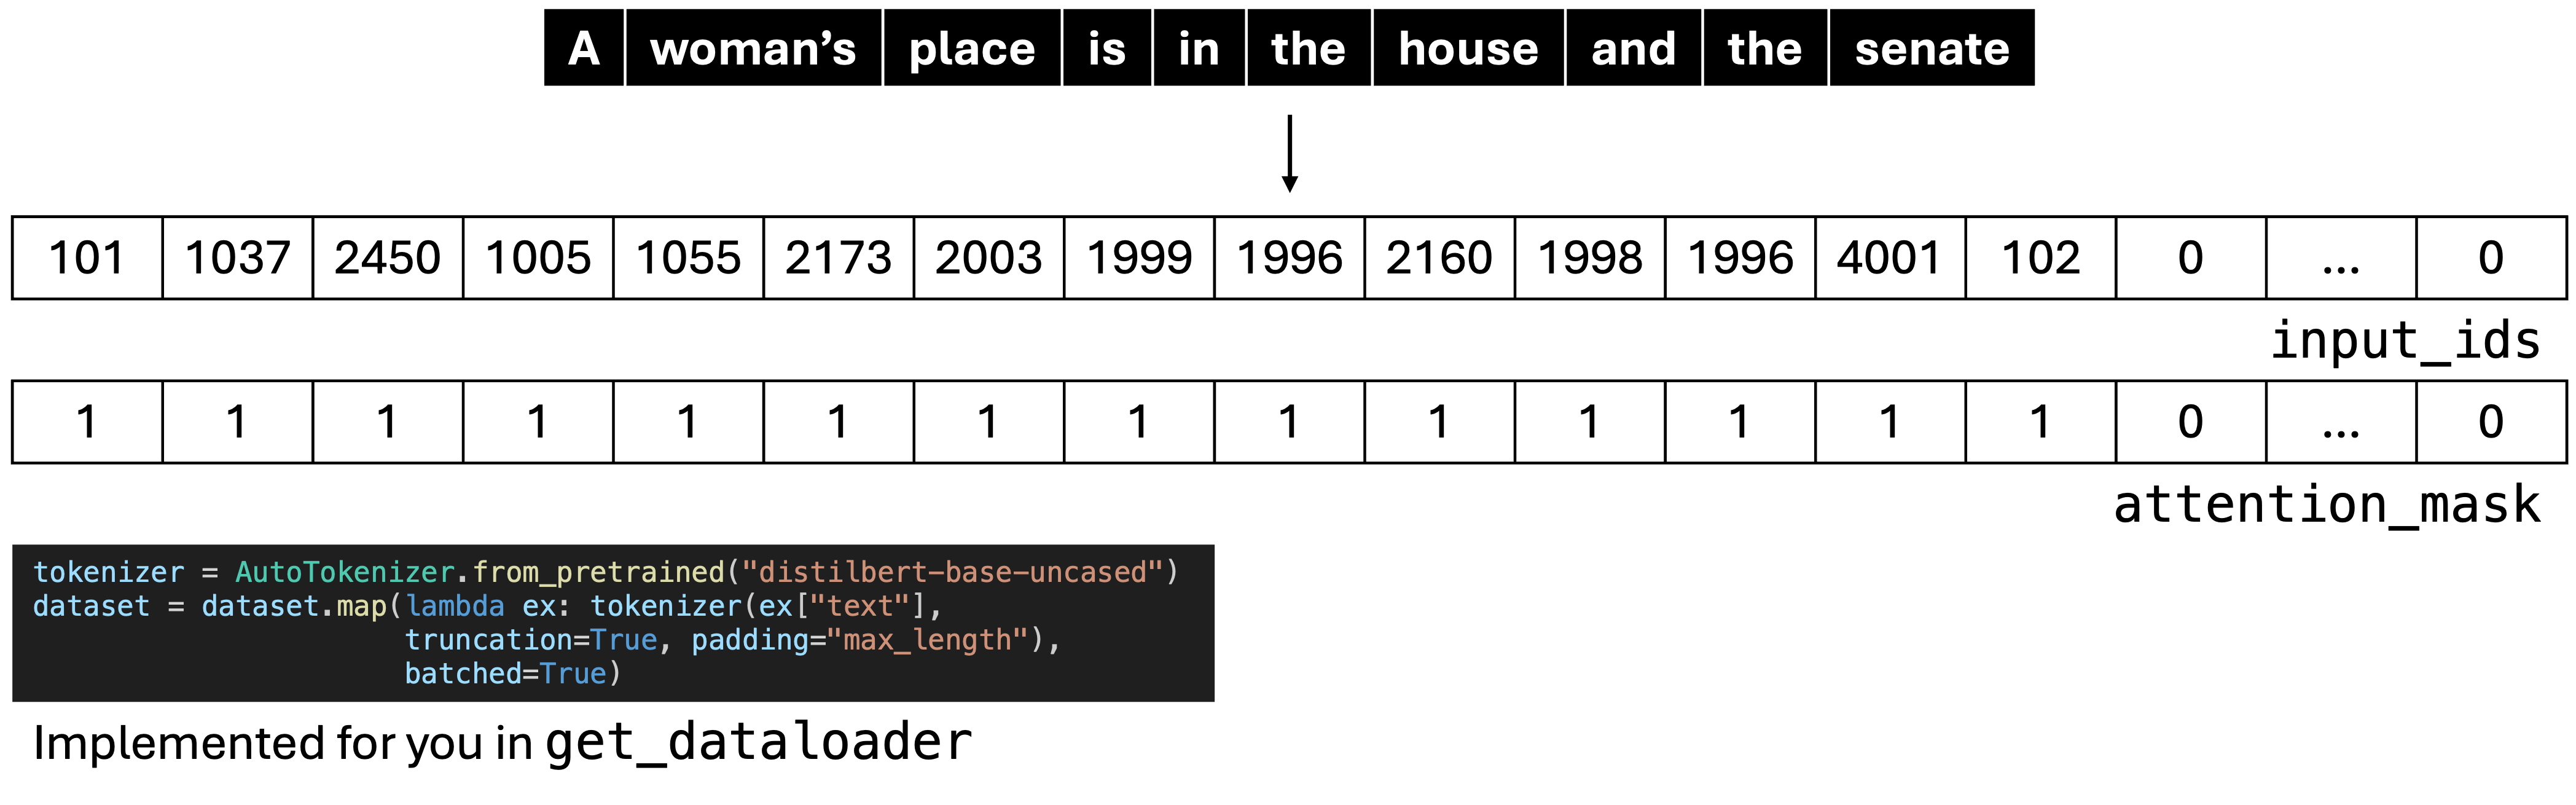
The get_dataloader function returns a pytorch dataloader object, which contains the text, input IDs, attention mask, label, and the label converted to an int. This data is batched, which means that in practice your input IDs and attention mask are matrices, not vectors. In practice, your code does not need to change much at all to allow for batching. The dataloader is iterable - if you run this code with one of the dataloaders, you’ll print a bunch of dictionaries that looks something like the output below (except for generally much much more offensive).
for batch in train_dataloader:
print(batch){'text':
['So this guy thinks women are garbage? Wow lol.',
'basically all of it except for misogyny',
'Counterpoint: almost no one is actually afraid of being labelled as transphobic. Transphobia is an incredibly common prejudice which carries little to no consequences - which is how this article and headline got published in first place URL',
"I think that is one of the most incredible things I've ever heard and I will quote it everytime I have to explain queer"],
'label': ['supportive', 'supportive', 'supportive', 'supportive'],
'label_int': tensor([0, 0, 0, 0]),
'input_ids':
tensor([[ 101, 1045, 2614, ..., 0, 0, 0],
[ 101, 10468, 2035, ..., 0, 0, 0],
[ 101, 2065, 2505, ..., 0, 0, 0],
[ 101, 1045, 2228, ..., 0, 0, 0]]),
'attention_mask':
tensor([[1, 1, 1, ..., 0, 0, 0],
[1, 1, 1, ..., 0, 0, 0],
[1, 1, 1, ..., 0, 0, 0],
[1, 1, 1, ..., 0, 0, 0]])
}
Update
I’ve updated the get_dataloader function in the starter code to hide the text by default so that it’s easier to not have to look at the offensive text. If you copied over the starter code before this change, run the following command inside your homework directory to get the updated version:
cp /home/lbiester/CS457HW/HW5/starter_code/util.py util.pyYour Model Code
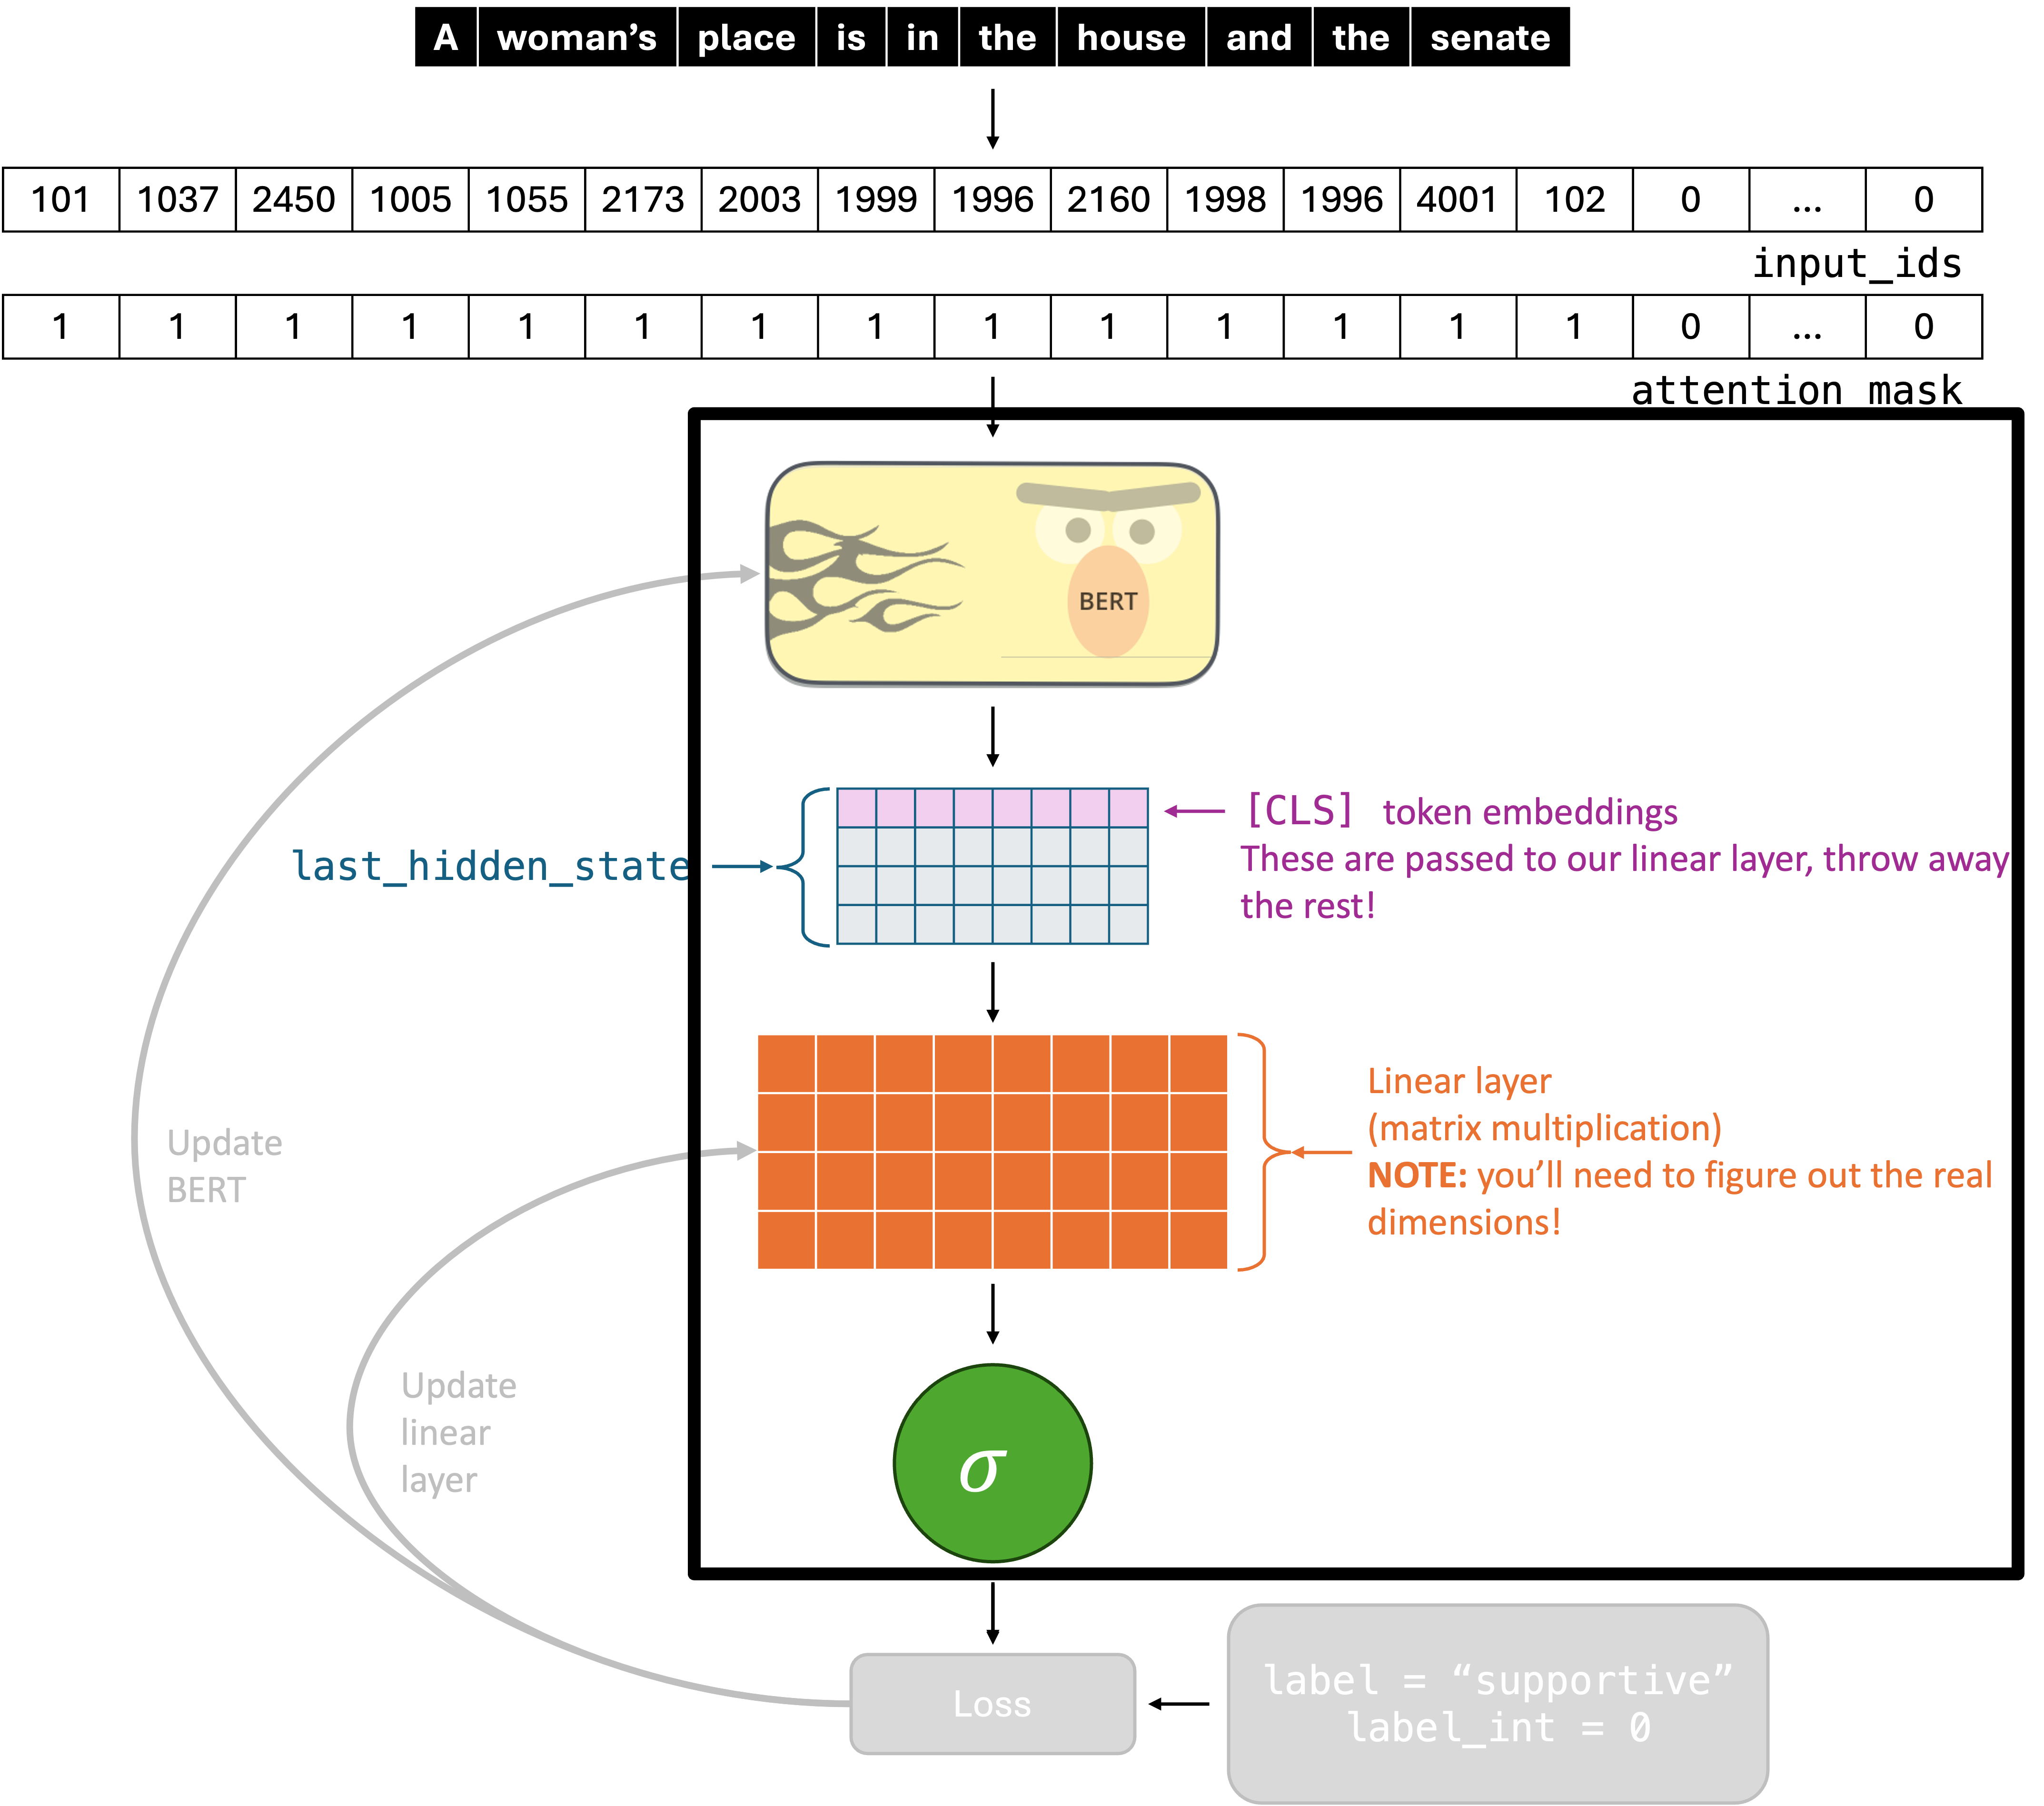
You’ll want to start by implementing your HateSpeechClassificationModel in model.py, which should extend nn.Module. Essentially, you are implementing the parts of the diagram that are colorful and are in the black rectangle.
__init__ method
The __init__ method has the following arguments:
def __init__(self, freeze_bert: bool = False):In your __init__ method, you should initialize all of the necessary weight matrices. The linear layer is just a normal linear layer (we’ve seen examples in class). The hardest part might be choosing the dimensions - the BERT embeddings will have 768 components. It is left as an exercise to you to figure out what the output dimension of your linear layer should be, but as a hint, this is a binary classification problem and we will use BCELOSS.
The BERT model should be initialized using the following method from the transformers library and stored using an instance variable.
AutoModel.from_pretrained("distilbert-base-uncased")Don’t worry about freeze_bert for now - it will be discussed later.
forward method
The forward method has the following arguments:
def forward(self, input_ids, attention_mask):You can see that this matches the diagram. The input is both the IDs and the attention mask (which has 0s when padding was used to make the input IDs have equal length for different sentences).
Your task is to compute your output by going through a number of steps that should match the diagram:
- Pass the input through BERT
- Get the last hidden state’s
[CLS]token embedding - Pass the
[CLS]embedding through a single linear layer1 - Apply sigmoid
Hint
The model code should be very concise. Mine (excluding comments) is less than 20 lines.
Testing
You’ll really put your model code to the test when you train your model, but to confirm that things are working as expected, you might want to write a script that initializes the model and goes through a forward pass on a single batch, confirming that there are no errors (e.g., due to mismatched dimensions in your pytorch tensors).
Your training code
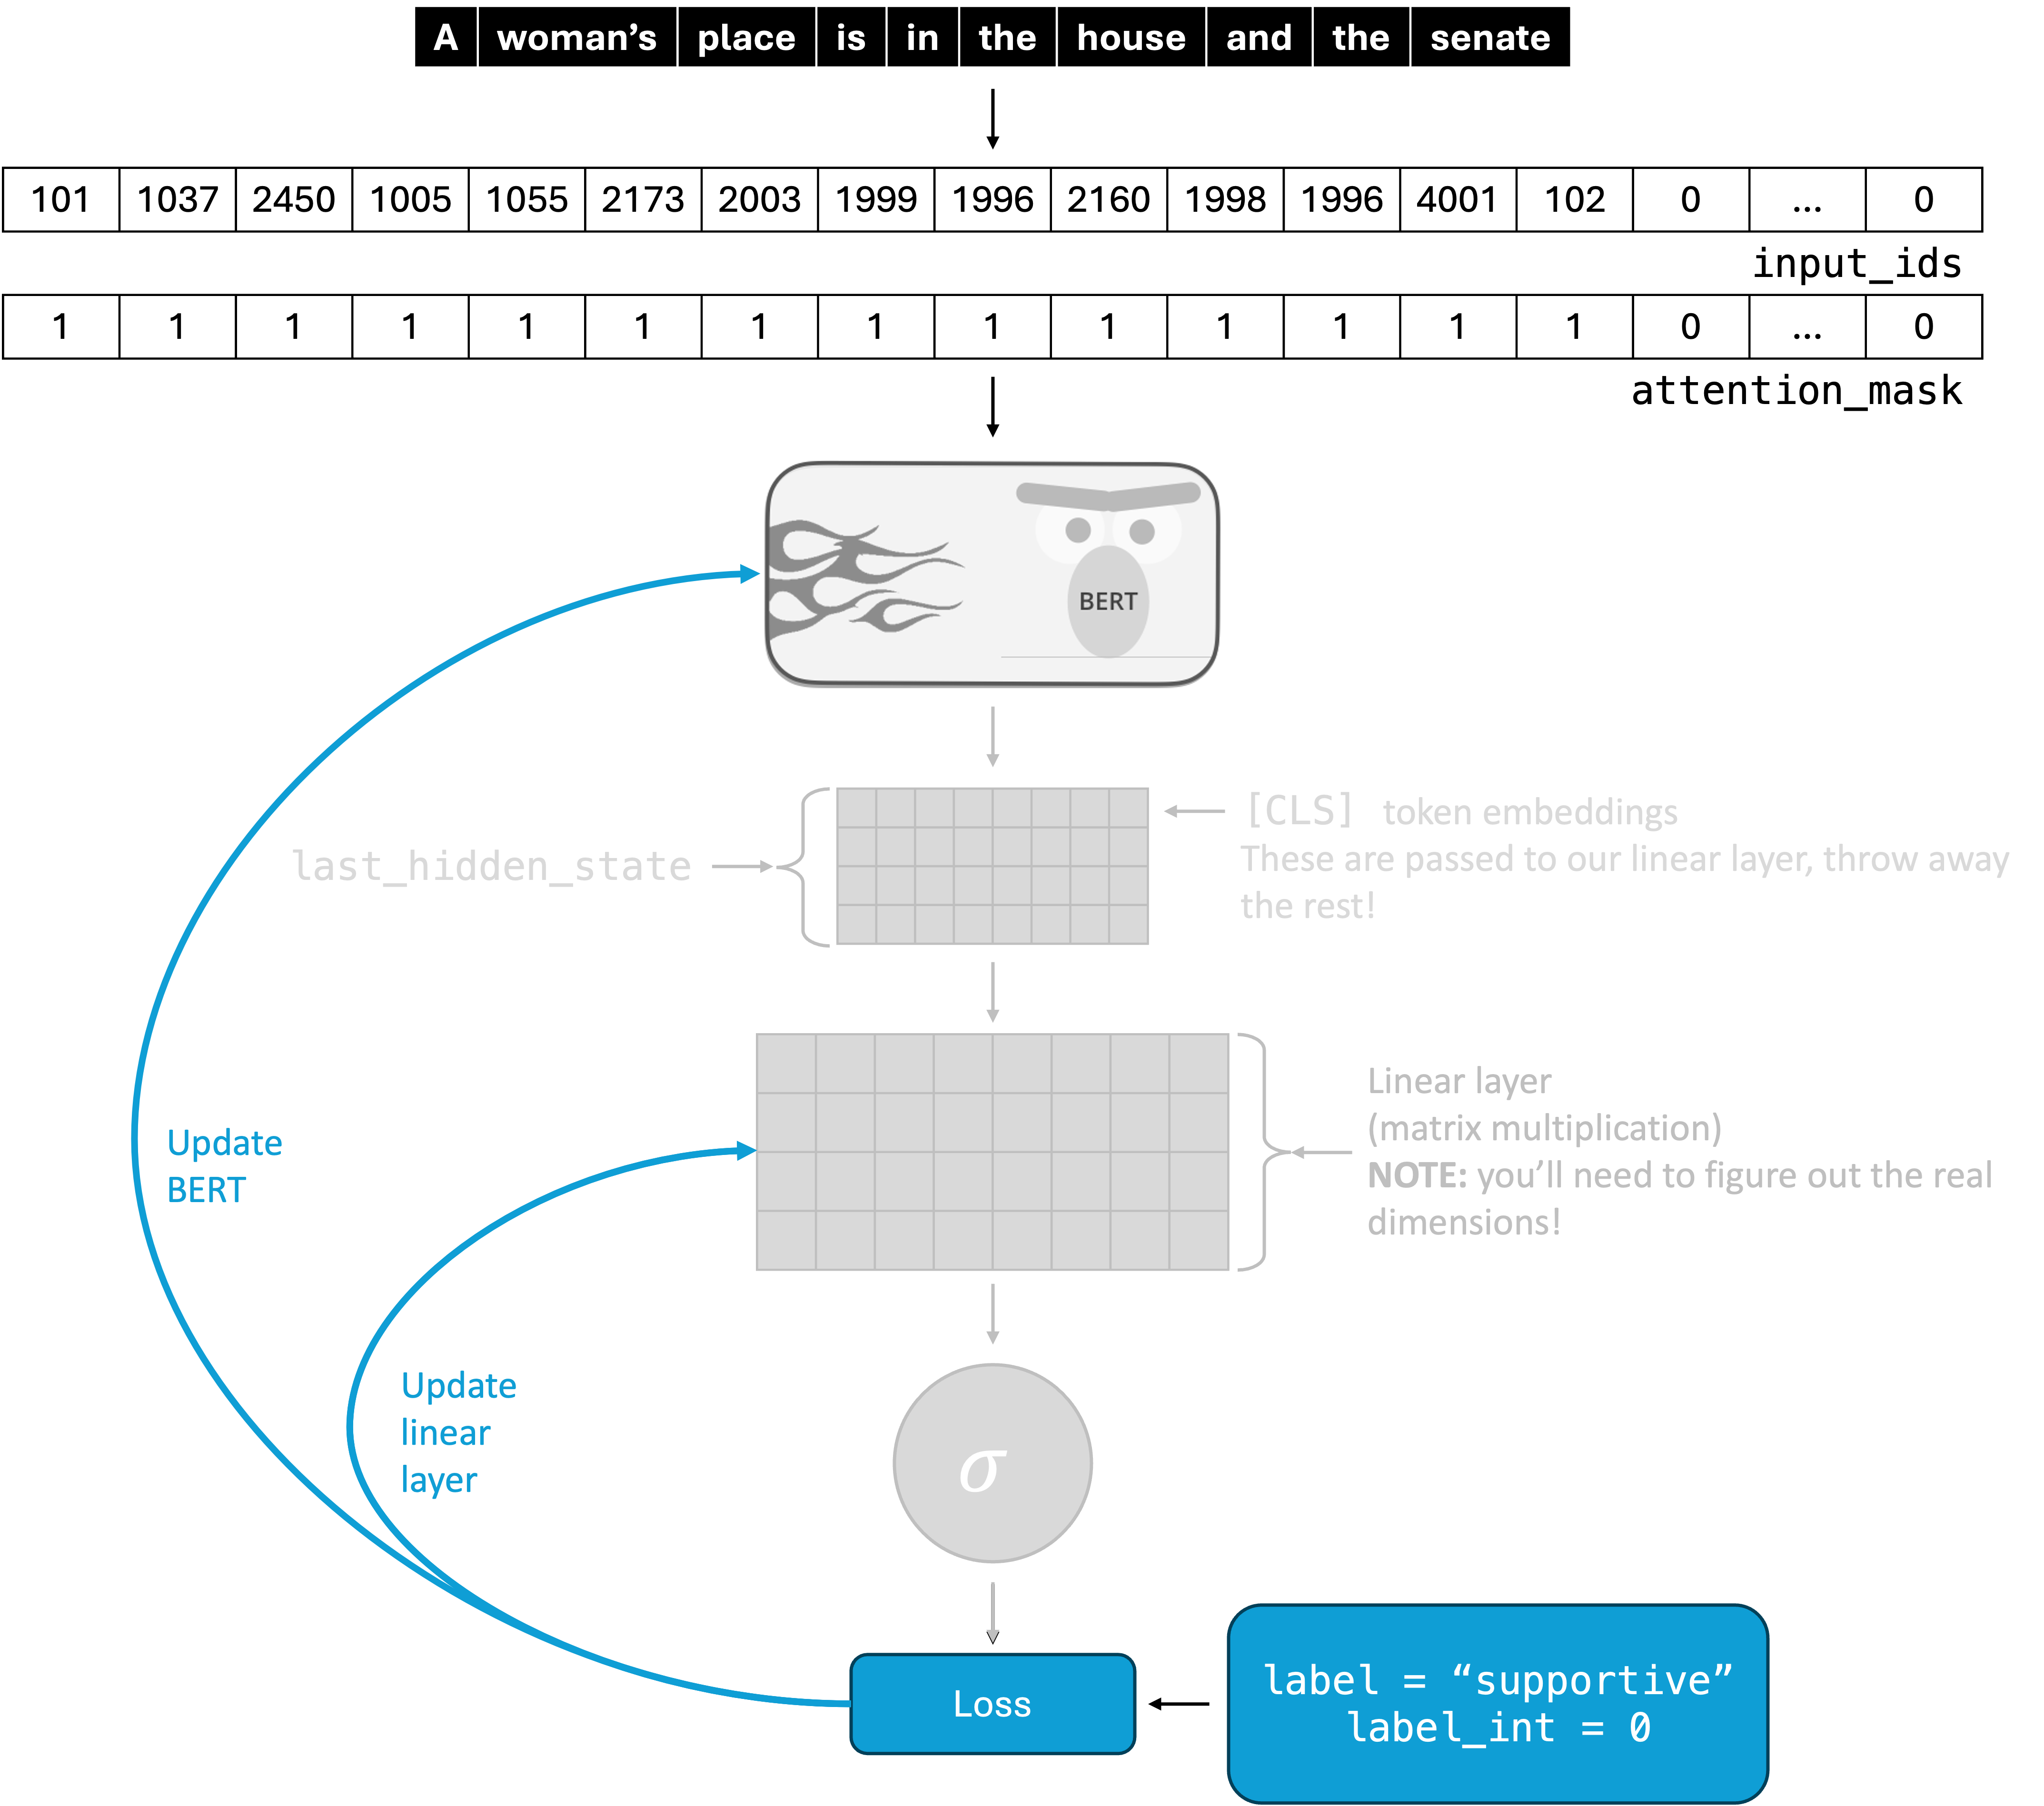
Your training code will focus computing the loss and updating weights, essentially focusing on the highlighted part of the figure:
This is about bringing it all together. For each batch, you should:
- Go through a forward pass of your model
- Compute the loss using the binary cross-entropy loss function
- Update your weights using SGD2
Each pass through your training data is one epoch, and your code should go through the data epochs times.
Using GPUs
To speed up training, you are expected to train your model on the GPUs that are available on the ada cluster. Training your model using a GPU requires minimal changes to your code. In the starter code, your model has already been copied to the GPU using the following code:
model = HateSpeechClassificationModel(freeze_bert=freeze_bert).to(device)You’ll need to copy input_ids and attention_mask to the GPU as well using to. And, to compute your loss, you’ll need to copy the integer representaion of the labels as well. There are examples that might be useful for these in the model_accuracy function in util.py.
Use device rather than writing cuda directly to ensure that you are not trying to use GPUs if they are not available.
Use the following sbatch command to train your model:
sbatch train_base.sbatchThe .sbatch script is in the starter code!
Tip
If you implement the model and training loop as described in this assignment, you should not need to change any of the command-line arguments in train.py. I already did a little bit of hyperparameter tuning for you, so your accuracy should be sufficient without having to do it yourself (and taking away GPU time from your classmates).
Output
At the very least, your train script should print the accuracy on the development set after all of your epochs. You can compute the accuracy on the development set with the model_accuracy function in util.py.
To see if your model is working well, I recommend printing the following after each epoch:
- The total or average loss during that epoch
- The accuracy on the training set
- The accuracy on the development set
Frozen vs. Unfrozen BERT weights
Once your model is working properly, you will implement the freeze_bert argument in HateSpeechClassificationModel. This will allow you to see how fine-tuning affects your model’s performance. See the image below for a visual representation, and note that you still need to update the weights of your linear layer!
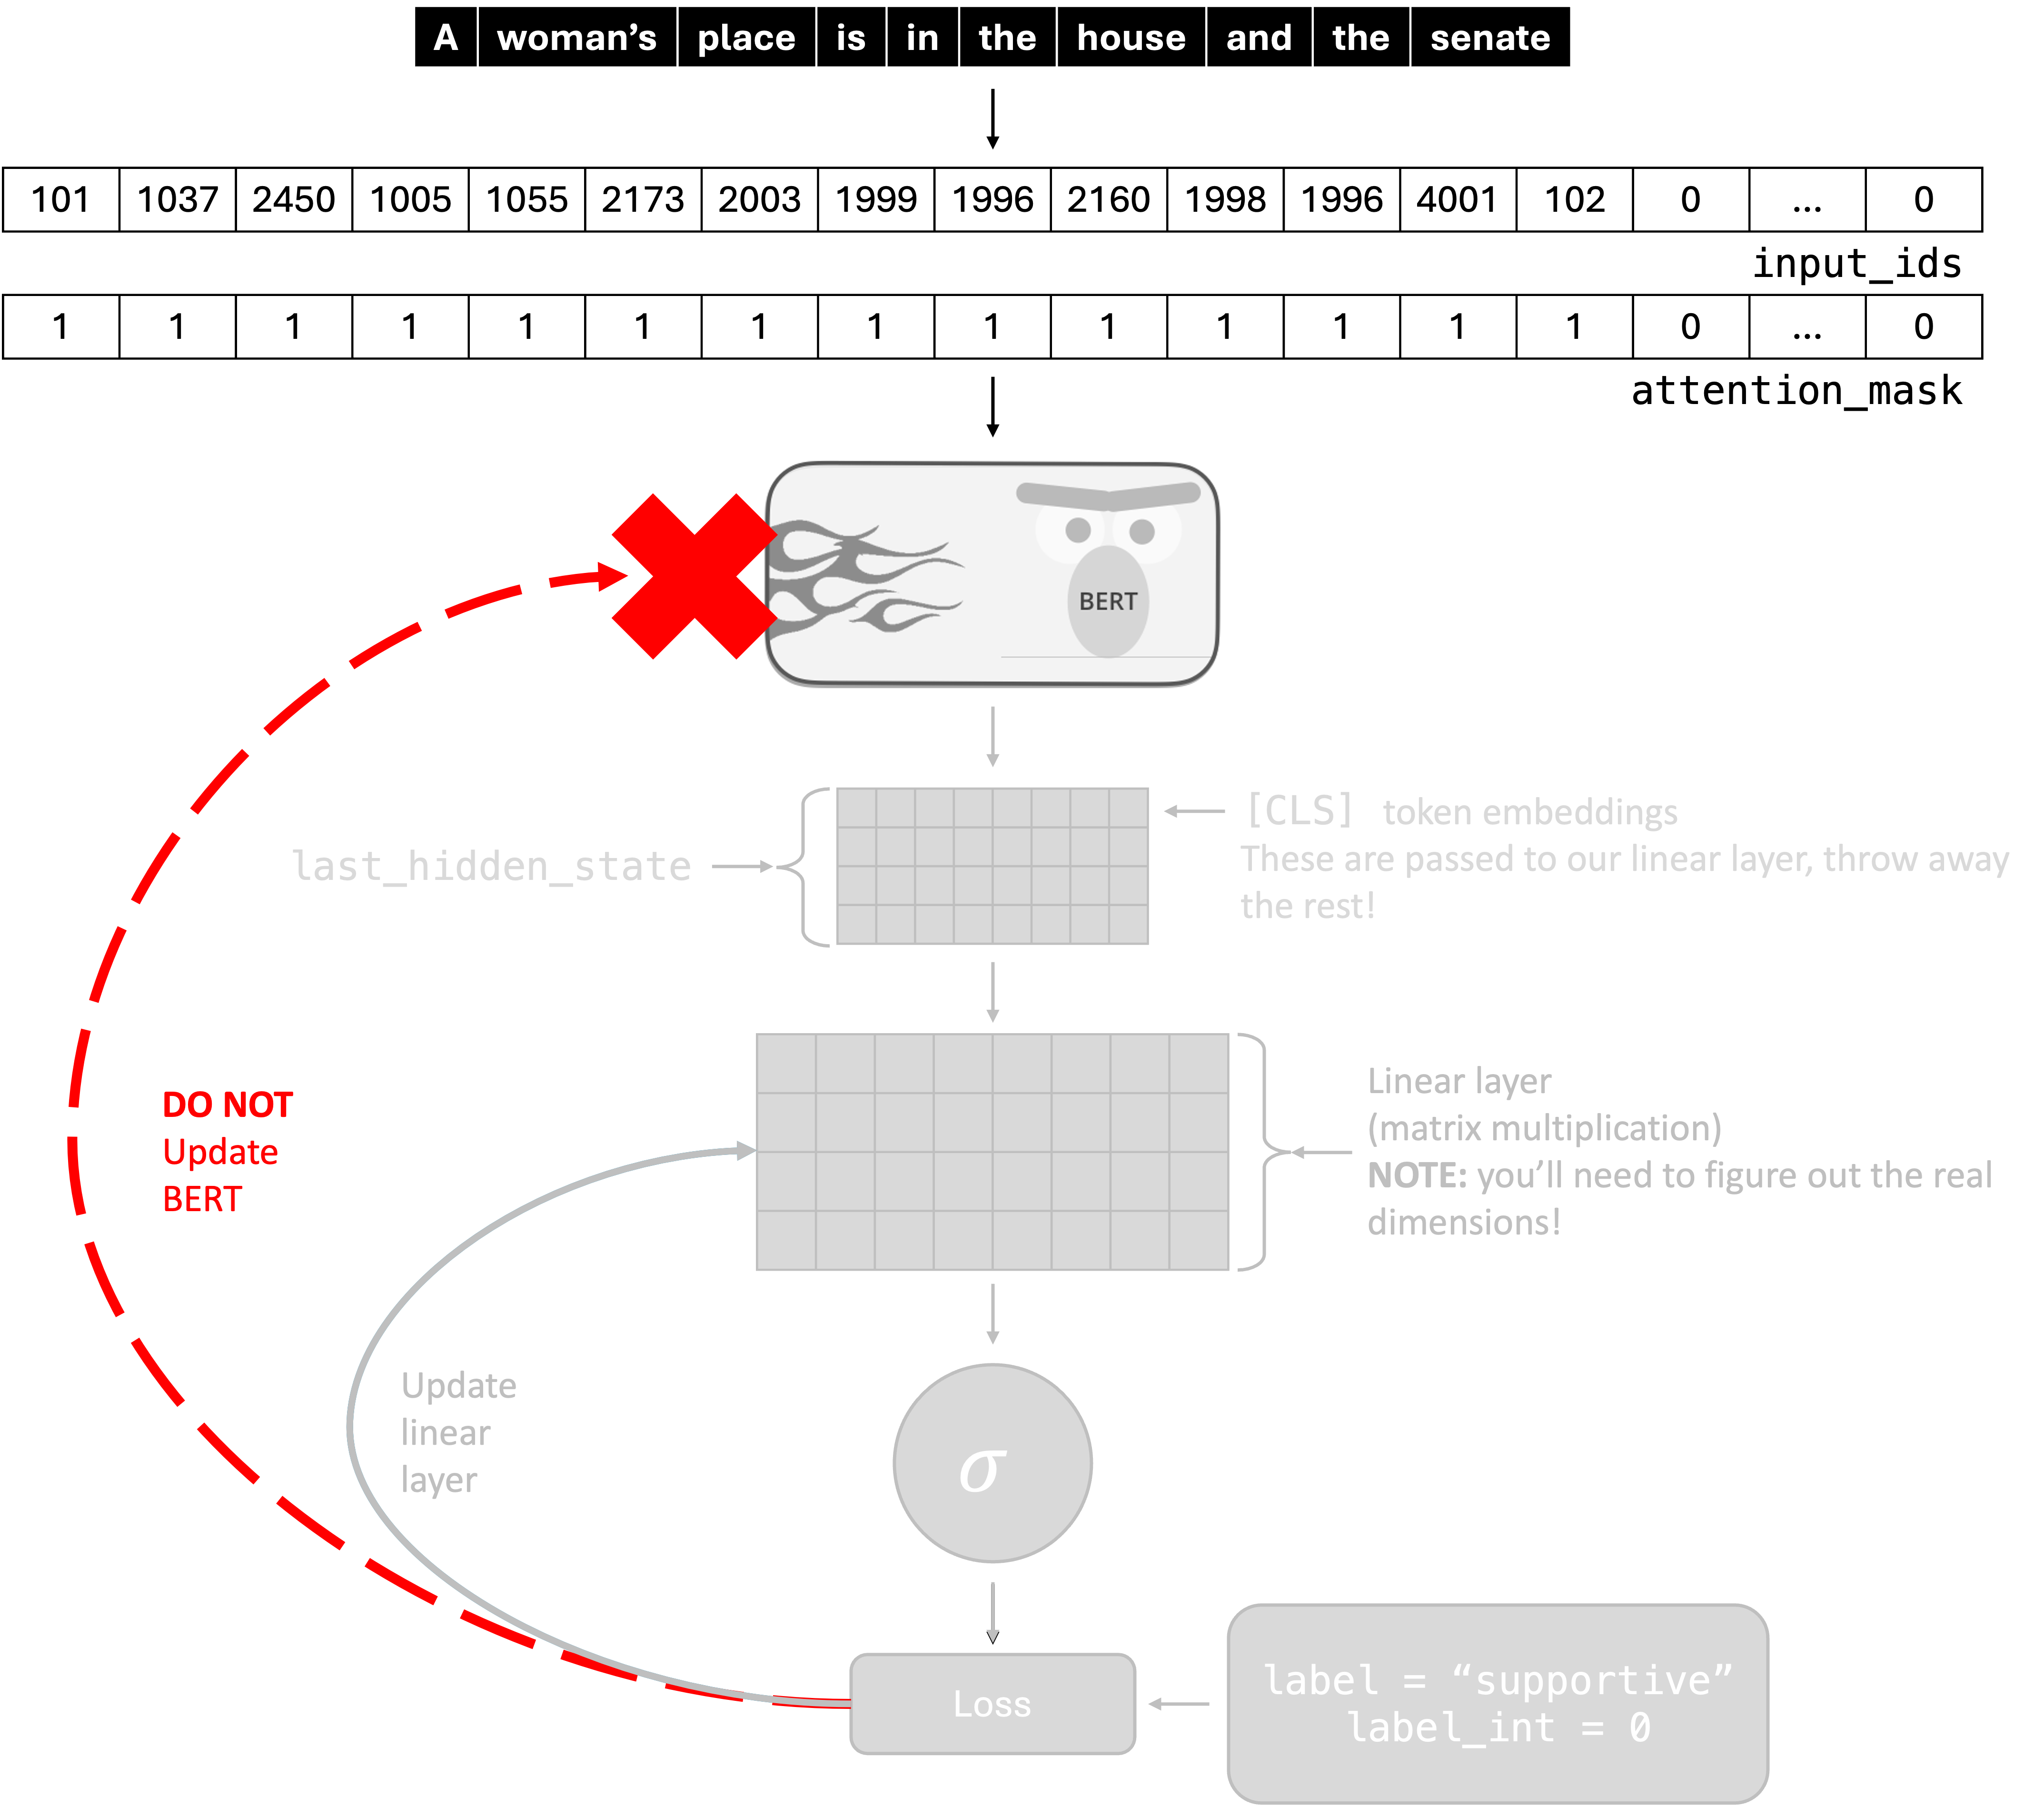
To stop a model parameter param from being updated during training, you can set param.requires_grad = False. You should do this for all of the parameters associated with the module that you initialized with AutoModel.from_pretrained("distilbert-base-uncased"). You can get the parameters of a module using .parameters() (which is iterable).
Use the following sbatch command to train your model with frozen BERT weights:
sbatch train_frozen.sbatchThe .sbatch script is in the starter code!
Deliverables
Code
You should submit model.py with your HateSpeechClassificationModel implemented as well as train.py. They should be implemented as described above.
Report
In addition to your code, you must fill out the report in report.md (from the starter code).
Submitting your code
You can right click on a filename in the Explorer tab on vscode, then click “Download” to download it to your computer from ada. You should download the files, then upload to gradescope.
Footnotes
For this assignment, I don’t recommend more than one linear layer for the sake of keeping training time as minimal as possible↩︎
You are expected to implement your model with SGD rather than other optimizers. If you want to experiment with different optimizers, the project is a good time to do so!↩︎