Image Processing
0. Learning objectives
- Represent images as a grid of pixels,
- Perform transformations of images.
1. ImagesNow for a fun application of the things we have learned so far! We will do some image processing, which will give us some more practice with iteration. Specifically, we will now have nested loops to iterate along both the width and height of an image. An image is a rectangular grid of pixels (short for "picture element"). The number of pixels in the horizontal direction is the width of the image, whereas the number of pixels in the vertical direction is called the height of the image. Depending on the type of image, at every pixel, we either store a single value representing the luminance or intensity of the pixel or we store three values: R (Red), G (Green), and B (Blue). In the first case, we have what we call a grayscale image where the image only has different shades of gray. In the second case, we have a color image. As we mentioned, in this class, we will represent color as an RGB triplet. That is, we use the values for R, G, and B, answer the questions: "how much RED do we have at the pixel?", "how much BLUE do we have?" and "how much GREEN do we have?" Each of these R-G-B values (often referred to as channels) will be a value between 0 and 255 (i.e. 1 byte (8-bit) => $2^8$ different levels for each of the colors). The higher the value (closer to 255), the more of that specific color we will have in that channel. For example, a red value of 255 means we have a lot of red at the pixel, but a red value of 0 means we don't have any red at that pixel. These RGB triplets will be stored as 3-element tuples (or lists). When using grayscale images, we will only need one channel, so we only store a single 8-bit value instead of a 3-valued ist. |
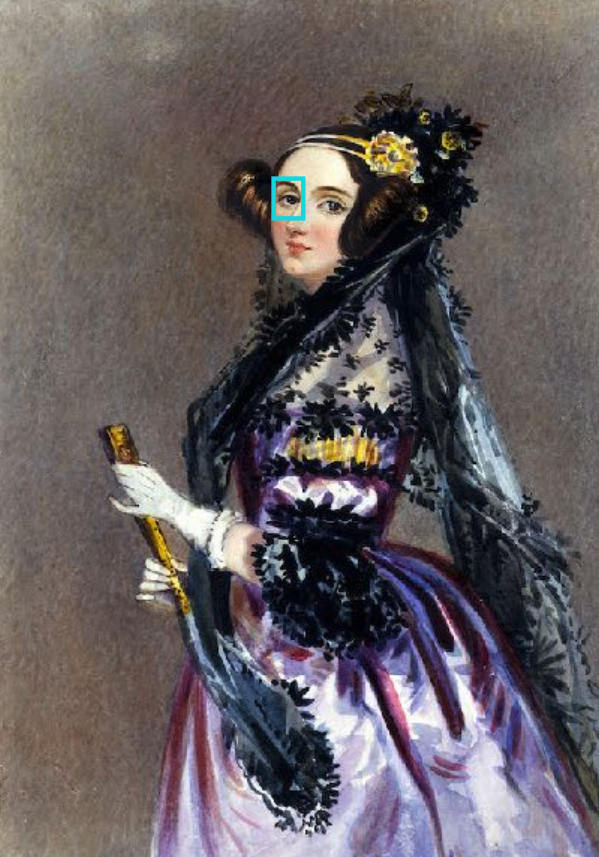
A picture of Ada Lovelace (the first computer programmer): hover the mouse over the image to zoom in and see the pixels. |
2. Storing and manipulating images
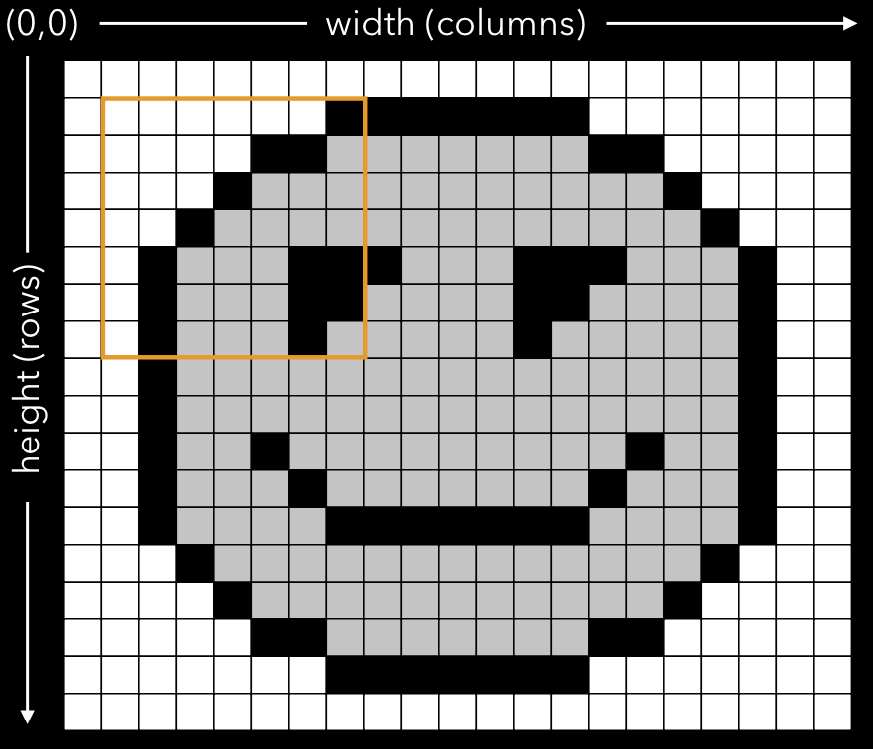
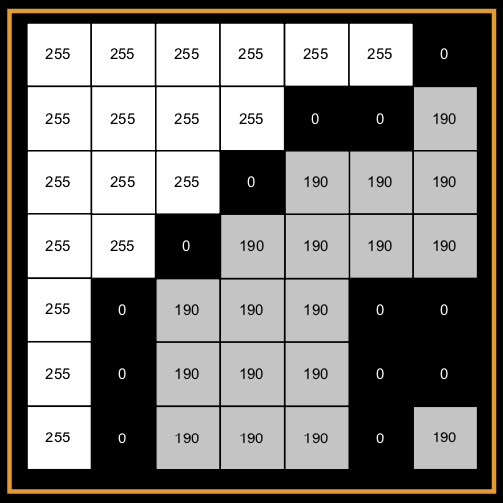
You might be used to a coordinate system in which the origin is at the bottom left corner. Images are a little different because they use a different convention. In particular, the origin of the image is at the top-left corner. This means that looping through the pixels along the width of the image follows the normal intuitive procedure, however looping through the pixels along the height starts at the top and proceeds downwards. Have a look at the smiley image below - the image on the right is a zoomed-in version of the orange rectangle in the left image. This diagram shows that the top-left corner has "pixel coordinates" of $(0, 0)$. In this example, we are using a single channel to represent the color at each pixel, meaning it is a grayscale image.
|
|
If an image has a width of w and a height of h, what are the row and column indices
of the bottom-right pixel?
range when we talked about
loops). We will do all of our image processing applications using an in-house middimage module. This
module provides an interface to a few functions for manipulating images:
- open(filename):
img = middimage.open(filename)opens an image stored in a file calledfilename. This returns aMiddImageobject which contains the information required by our image (we'll talk in more detail about objects later on). - save(filename):
img.save(filename)saves an image to a file calledfilename. - new(width, height, channels): creates a new image. You should provide
widthandheightparameters to initialize a grid ofwidth x heightpixels, as well as thechannelsparameter to specify how many channels (1 for grayscale, 3 for RGB) your image will have (number of values stored at each pixel). - properties of images: retrieve the width/height of an image (perhaps saved in a variable called
img), usingimg.widthorimg.height. To retrieve the number of channels, you can useimg.channels. As mentioned above, in general, you will only have 1 (greyscale) or 3 (RGB) channels. - pixel access: individual pixels can be accessed using square brackets, just like we did for lists and
sounds. The difference, however, is that we should provide two indices to access a particular pixel.
The first one is the row index (species the row that you want to access), and the second one is the column
index (specify the column you want to access). For example, to access the pixel at a row
rand a columncfor some imageimgwe would typeimg[r, c]. This can be used to retrieve and assign the values of the pixel (i.e. images -MiddImageobjects - are mutable). The values that you can assign to each pixel (or that you will read back from each pixel) are either single values, if the image is grayscale, or tuples (or list) of three values (R, G, B) if the image is color.
Some of the operations we can do on images will make more sense with some examples, so let's get into some image processing! Here are some questions to ask yourself as you work on an image processing problem:
- What is the size of the original image? what is the size of the resulting image?
- How many channels (either 1 or 3) will be in the resulting image?
- How should you loop through the rows/columns to process pixels in the original image?
- How does an iteration through the pixel rows/columns in the original image map to a row/column in the resulting image?
- How should we compute the color for the pixels in the resulting image?
As you look at the examples below, you might also notice that the typical workflow in an image processing function is:
- Make a copy of the original image, or create a new empty image depending on the operation that you want to perform
- Mess with the copy or the new image
- Return the new image without modifying the original one
2.1. Point operations (modify the value of a pixel)
Let's start playing around! Look at the examples below. We are modifying some of the pixels in an image. As we saw before, we can read the values of pixels within the image using their row and column coordinates and, because the data structures we use to store images are mutable, we can also modify the values of the pixels. If you look at the code below, can you thing what the resulting image might look like before running the code? Note: to use these following examples you will need to copy the code in Thonny.
The smile.pngimage above was small and black and white (only used the 0 -> black and 255 -> white
values for the grayscale). If you look at the representation at the end of the file, you can see an example of a
larger grayscale image. Still a single channel, but the values for the pixel change over the entire 0->255 range
giving different shades of gray. You might notice that, when we print the representation, Python will use dots
to let us know that there are additional values that are now shown.
The next repl, show example of messing with color images. Now, when we check for the value at a pixel, we will see that there are 3 values stored for each location in the image: R, G, and B (in this order). You can use either a tuple or a list to update the values. They both will work, tuples will be a little faster since, as we saw, they are a "lighter" data structure. Notice how the image is represented now: 3 values for each pixel. Once again, try to visualize what the image might look like before you run the code.
In the examples above, take a look at the crop() function we created. It iterates over a smaller
section of the original image, extracts the pixels' values and uses them to fill up a new smaller empty image
that we previously created. This approach allows you to extract section of an image that you might be interested
in a create new images with them. Of course, you can perform multiple operation within each individual function
or, which is more typical, cascade the functions to obtain the desired result.
Also interesting in the example above is the lighten() function. Try to apply it to different
images and look at the resulting image. You might notice that certain region in the resulting image seem to have
been "corrupted". The colors (hence the pixels values) don't look what you might expect. What is happening is
that, if you try to write a value larger than 255 inside a pixel (either as a single value for grayscale or as
any of the R, G, and B), the value that you end up with is the value you try to write modulus 256. This is
because you only have 8 bits to represent your pixel values. So, if you try to write 260, you will end up with a
value of 4 stored. In order to avoid this and make sure that you only store values within the range, if you
expect that your values might be larger of 255 or negative, you will have to enforce the range within your
function. For this the min and max functions might be useful.
2.1. Relocating pixels (read from one location and place in another)
The following set of examples will "move around the original pixels" in the sense that, as we scan through our original image and we read pixel from a particular location, we might place it in a different location in the new image. There are no restriction in what you can do, we can even make the destination image larger or smaller! This allows us to do interesting modification like turning images upside down, swapping parts, repeating an image, and so on.
For the upside down example, in response to the questions above, the size and number of channels in the
resulting image will be the same as the original image. We will loop through all pixels in the width and
height of the original image. The map from the original image to the resulting image is that the horizontal
pixel locations are the same, but the vertical pixel locations become height - i -1 where
i is the current pixel row being processed. The -1 is there so we don't go out of
bounds! The resulting pixel colors (after the map) will be the same as the original pixel colors.
Let's see the examples!
Examples
Here are more complex examples where we manipulate the value of pixel to create specific visual effects, like adding a sunset feel to a picture, or we combine multiple operations in a single function.
Example 0: Sunset
Example 1: Abstract art
Let's do another example. This time, we will do two things:
- We will swap the left and right portions of the image (down the vertical midline) and
- We will only have blue components of the color in the left portion while darkening all components of the color in the right side.
Again, the resulting image is going to have the same width, height and number of channels as the original
image. Also, we will loop through all pixels in the vertical direction (height number of pixels),
however, we only need to loop through half the pixels in the horizontal direction. We loop through half the
width because we can make two assignments for the left and right portions of the resulting
image. We first retrieve the color of the pixel on the right side of the original image and store this in the
variable c. To assign the new pixel color on the left side, we just zero out the red and green
components (a 0 in the first two items in the tuple). We then retrieve the appropriate pixel color to assign in
the right and darken it by multiplying the components by some factors. I picked (almost randomly - just made
sure each of them was less then 1!) factors of $0.8$, $0.5$ and $0.2$ on the red, green and blue components,
respectively, but these could have been anything (or maybe something specific to your application).