Animations & Games0. Learning objectives
Here we will investigate another application which will give you more practice with object-oriented
programming, along with all the other programming concepts we have covered so far. We will first look at
animations, in which we will create a series of frames that demonstrate how an object
moves in time. An animation occurs over some fixed time interval, i.e. we start at some
initial time and end at some final time. This will lead to a discussion of games, which aren't too
different than animations. The main difference is that, with a game, we keep creating frames
forever until the player wins/loses (or if they give up). This also means we need to handle user
input, which we will do in the form of events. We'll first talk about the general concepts
behind animations & games, and then discuss how to implement them using a module called
|
|
In order to use pygame in Thonny, you will need to go to Tools -> Manage Packages, search for
"pygame" and then click Install. You can always copy the code in the examples below in your Thonny
to play with it.
1. Animations
As mentioned above, an animation involves describing how some object moves in time. This isn't a course in computer graphics, but let's get an idea of how artists (e.g. at Pixar) create these animations. If you want to learn more about the programming and math behind animations, you can take Computer Graphics (CS 461) or you can take INTD 215 (3D Computer Animation) which involves using software to create animations (hiding the programming and math behind them).
In the demo below, we want to specify the motion of a bouncing ball (our object) from some initial time to some end time. In general animators specify the motion of the ball using curves in which the horizontal axis is time and the vertical axis is the parameter that describes the motion of the object (as time passes). Here, we are animating the vertical position of the ball as time passes. If you click the button, you should see a Pixar ball bouncing. Notice the red ball tracing the curve. The horizontal coordinate of the red tracer is the time at a particular frame in the animation and the vertical coordinate is the $y$-coordinate of the actual ball. The black circles represent fixed points on the curve, whereas the pink circles allow you to modify the curve representing the vertical motion of the ball. Try to click and drag the pink circles to modify the curve.
Note that this description of the ball's motion may not actually capture the physics correctly. However, in a cartoon, we may not really care about capturing the physics correctly. We may want something that looks reasonably physical while also capturing other intangible aspects of the motion, such as exaggerating the squishing of the ball when it hits the floor. This is known as the squash and stretch principle.
The main thing to remember from this example is that we have some start time (usually $t = 0$) and some end time, such as $t = 1$ second. Then we generate frames by taking steps in time. In other words, we might want to create a frame (a picture of our scene) at intervals of $0.1$ seconds, meaning we will have 11 frames total (remember to include the start and end frames). We need to figure out what to draw in each frame, which means we need to update the objects to their new locations based on how their motion is described. Some pseudocode for creating an animation is given below.
1. specify t_final (final time), delta_t (time between frames)
2. initialize t = 0
3. while t <= t_final:
    a. update objects in scene according to time t
    b. clear scene and draw objects at new positions
    c. update t += delta_t
1. Games
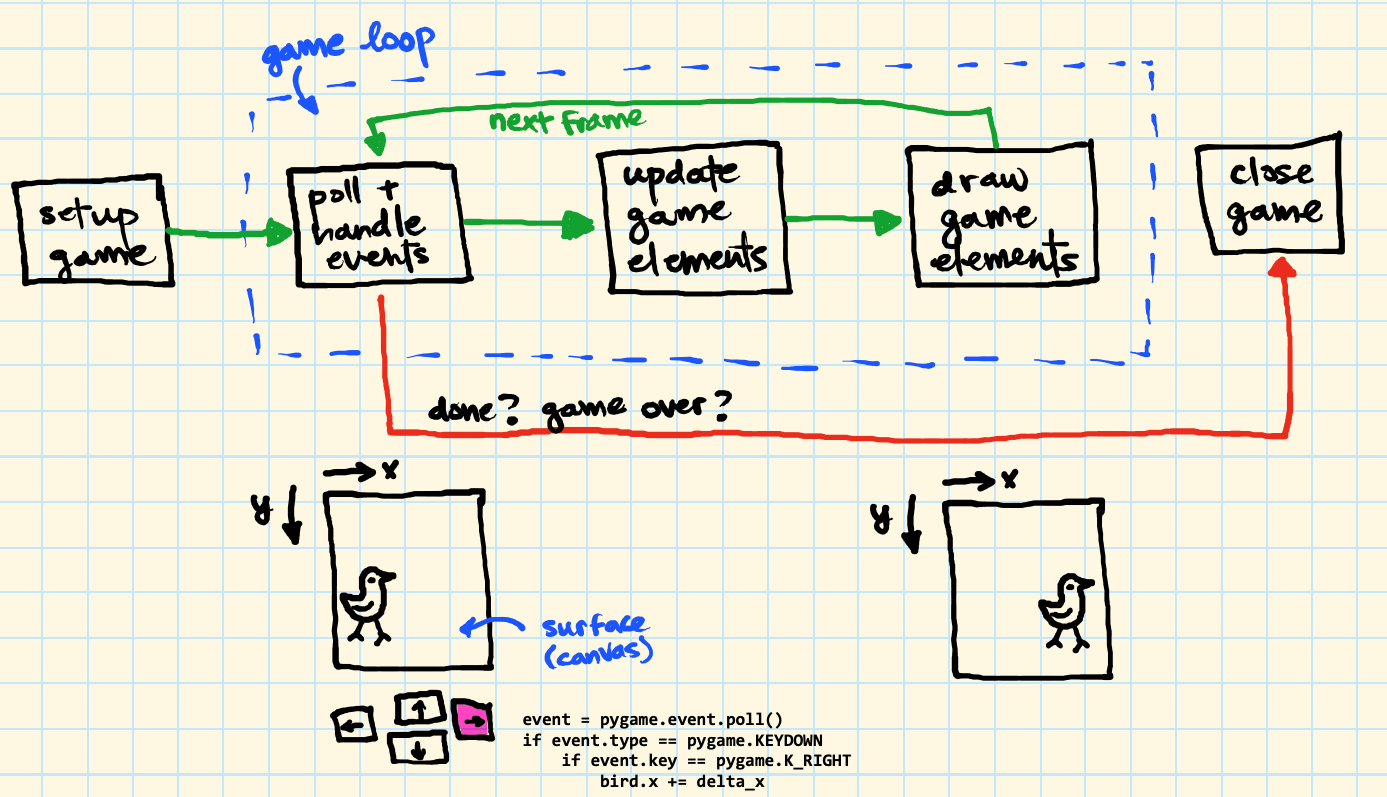
Games are really similar to animations. Actually, they're a bit less complicated because we don't need to check if we reached the final time. We just keep looping forever! Well, not exactly forever. We loop until the player wins or loses, or gives up. This means we also need to account for input we might receive from a player. So we need two things
- a game loop that generates frames at each time step, and
- a way to handle player input (events)
1.1. The game loop
A sketch of the components of a game are shown above, and some pseudocode is provided below (after the
pygame documentation). We first need to setup the game. Then we enter the game loop. The first
thing we do inside the game loop is check if the player has interacted with any of the controls. This is called
"polling and handling events", which will be elaborated upon below. These events will tell us whether (and
where) to move elements in our game. For example, imagine pressing the "right arrow" which moves the player to
the right. After updating the game elements, we then draw them to a surface, and then finally display
the surface. The term surface is a pygame-specific term that you can think of as a
canvas on which we draw our scene.
I keep talking about "taking steps in time," so let me clarify how we actually achieve this. We could specify
some delta_t (i.e. change in time) between successive frames. On each iteration in the while-loop,
our time variable increases by delta_t. However, we also need to consider that different computers
will execute our programs at different speeds. Game systems, such as pygame, allow us to control
the frame rate, i.e. the number of Frames that get drawn Per
Second (FPS).
1.2. Polling for, and handling events
We might want to associate a keyboard press, or a mouse click, or a joystick motion with movement of our game elements. There are different ways to make these associations. A common method is to specify callbacks in which we provide our game system with a function that automatically gets called when we hit a key, move the mouse etc. Instead, we'll use a different method, called polling for events, which makes our life a bit easier.
At the beginning of our game loop, we will "poll" for events from our game system. Think of this as asking our
game system (here, pygame) a question: "hey, tell me if a key was pressed or if the mouse button
was clicked!" The game system should return some kind of event information, which tells us
- what kind of interaction did we have (key press? mouse motion? mouse click?) and
- what specific key was pressed? or where is the mouse located on the screen?
1.3. Using pygame
The above gives a rough idea of how to implement a game, but let's actually make it happen with
pygame. We're using pygame because it abstracts some of the details related to
drawing, event handling and game physics for us. The latter will be useful for things like handling collisions
between objects in the game.
The following sections are broken up into documentation for:
- top-level
pygamefunctions, - internal modules,
- classes and
- internal variables within
pygame.
pygame (remember to importpygame!). The classes and functions described below are not an
exhaustive list, but will suffice for the games we will develop in our course. Please consult the
pygame documentation if you would like to learn more: https://www.pygame.org/docs/index.html. You can navigate to a
specific class, module or function using the green rectangle navigation banner at the top. Sometimes, the best way
to learn how to use a module is to study some tutorials and examples, so we will do a few examples below. In the
following, keep in mind that the coordinate system has the top-left corner as the origin, with $y$ increasing
downwards (just like MiddImage).
1.3.1. Useful functions in the pygame module
There are a few functions we will need to initialize and shut down a game with the pygame module.
| function | description |
pygame.init() |
Initializes pygame modules. This needs to be the first thing called! Always! |
pygame.quit() |
Quits the game and terminates all pygame modules. This should be the last thing called when
exiting the game. |
1.3.2. Internal pygame modules
In addition to functions defined in the top-level pygame module, we will use modules
internal to pygame. We can access functions and classes defined in these modules with
pygame.[insert module name] just like we would normally access a function within a module. For
example, in the first function of the table below, we would use
pygame.display.set_size( (screen_width,screen_height) ). Similarly, classes such as
Clock() are accessed through pygame.time.Clock(). Remember the conventions we've been
using: a lowercase name usually refers to a function, whereas a name with the first letter capitalized is a
class.
| module | description | functions & classes |
pygame.display
|
Controls the display window and screen. | |
pygame.draw
|
A module used to draw primitives shapes (like rectangles, circles, polygons) to the screen. We will mostly draw rectangles. |
|
pygame.event
|
Useful for handling events from the player! |
|
pygame.font
|
Provides an interface to font objects so we can write text to the screen. | |
pygame.image
|
Useful for loading images so we can "blit" them to a surface. Using images makes the game more fun than basic shapes! |
|
pygame.time
|
Provides an interface to the Clock class for controlling the frame rate of the game. |
|
pygame.transform
|
Useful for transforming images, such as resizing them (by scaling), or rotating them. |
|
1.3.3. Useful pygame classes
Within the top-level pygame module, or one of its internal modules, there are a few classes we
will use. The following table also describes which methods we will use from these classes.
| class | description | methods |
pygame.Surface(size_tuple) (doc)
|
A Surface is the canvas on which you will draw things and is initialized by a tuple
size_tuple = (width,height). In our course, we will either draw rectangles, images or text on a
Surface. |
|
pygame.Rect(x,y,w,h) (doc) |
Represents a generic rectangle in a game and can be initialized using the $x$- and $y$ coordinates of the
top-left corner of the rectangle along with the width $w$ and height $h$ of the rectangle. Rectangles are
useful for drawing rectangles on a Surface, as well as detecting collisions between other
objects. |
|
pygame.time.Clock() (doc) |
Represents an object used for timing, which is useful for making sure time in the game progresses at some specified frame rate. |
|
pygame.font.SysFont(font_type,font_size) (doc) |
Represents a "system font" object which is initialized from a particular font_type (such as
Arial) and font_size (an integer, such as 12). |
|
1.3.4. Internal pygame variables (codes)
Here is a short list of internal variables which are used to associate user interaction with "event codes"
that occur during gameplay. When retrieving a pygame.Event object, you can check either the
type or key attribute of the returned object to check if it matches one of the codes
below.
pygame.QUIT: an integer code that represents the user would like to quit the game (check withevent.type).pygame.KEYDOWN: an integer code that represents the user pressed a key (check withevent.type).pygame.K_LEFT: an integer code the represents the user pressed the left arrow key (check withevent.key).pygame.K_RIGHT: an integer code the represents the user pressed the right arrow key (check withevent.key).pygame.K_UP: an integer code the represents the user pressed the up arrow key (check withevent.key).pygame.K_DOWN: an integer code the represents the user pressed the down arrow key (check withevent.key).
1.4. General structure of a game using pygame
Below you'll find the general structure of a game written with pygame, including the setup, game
loop, and shut down. Other aspects of the game, like keeping track of time and enforcing a particular frame
rate, will be injected into various parts of this general framework.
Examples
Example 0: bouncing balls (similar to the turtle example in the OOP section but with balls playing tag)
This example shows how to set up a basic game loop in pygame as well as additional features like writing text on the screen.
(You will need to copy and paste this in Thonny to run it!)
Example 1: office animation
It's difficult to pick up a game by simply reading documentation - it's much better to learn by example. Here we will build a simple animation of a square bouncing around our scene (and hitting the walls), kind of like the DVD Logo scene from The Office (see the clip at the top of this lecture). Please see the comments in the code to see what each individual step is doing.
(You will need to copy and paste this in Thonny to run it!)
Example 2: adding a player & controls
Let's take our previous example to the next level. In particular, we will use several instances of our Square class to animate a bunch of squares! We will also add a red square that we will control with the keyboard arrows.
(You will need to copy and paste this in Thonny to run it!)